|

|
Guest
Anonymous Poster
marisa.marco@comcast.net
Jan 21, 2009, 2:53 PM
Post #1 of 2
(3950 views)
|
|
90 ford tempo thermostat
|
Sign In
|
|
I have a 90 Ford Tempo. How do I change the thermostat? And where is the thermostat?!!! I need all the details. I'm a girl. Please do not assume I know what I'm doing. 
|
|
| |
|
|
Tom Greenleaf
Ultimate Carjunky
/ Moderator

Jan 21, 2009, 3:19 PM
Post #2 of 2
(3948 views)
|
|
Re: 90 ford tempo thermostat
|
Sign In
|
|
If you don't have the tools and the place to do this it really shouldn't be that expensive to just have done and save the mess,
T
REMOVAL&INSTALLATION
REMOVAL & INSTALLATION
See Figures 1 through 6
When draining coolant, keep in mind that cats and dogs are attracted to ethylene glycol antifreeze, and could drink any that is left in an uncovered container or in puddles on the ground. This will prove fatal in sufficient quantity. Always drain the coolant into a sealable container. Coolant should be reused unless it is contaminated or several years old. - Disconnect the negative battery cable.
- Place protective covers on the front fenders.
- Drain the cooling system into a sealable container.
- Unplug the wire connector at the thermostat housing thermo-switch if equipped.
- Loosen the top radiator hose clamp. Remove the thermostat housing mounting bolts and lift up the housing. Remove the thermostat by turning counterclockwise.
- Clean the thermostat housing and engine gasket mounting surfaces.
To install:
- Install new mounting gasket and fully insert the thermostat to compress the gasket. Turn the thermostat clockwise to secure in housing.
- Position the housing onto the engine.Install radiator hose clamp and tighten to 20-30 inch lbs. (2.3-3.4 Nm). Install the mounting bolts and torque to 8-10 ft. lbs. (10-14 Nm).
- Refill the cooling system.
- Connect the negative battery cable, start the engine and check for leaks.
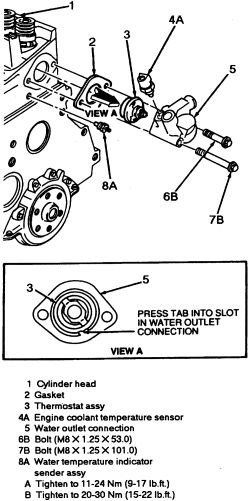 Fig. 1: Engine thermostat-2.0L engine Fig. 1: Engine thermostat-2.0L engine  Fig. 2: Engine thermostat-2.3L engine Fig. 2: Engine thermostat-2.3L engine  Fig. 3: Engine thermostat-3.0L engine Fig. 3: Engine thermostat-3.0L engine 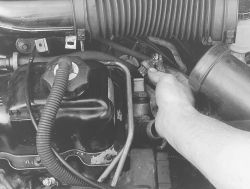 Fig. 4: Remove the harness from the housing Fig. 4: Remove the harness from the housing 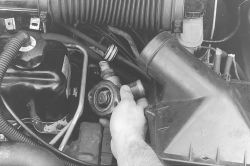 Fig. 5: With the retaining bolts removed, take the thermostat and housing out of the engine compartment, and place on a clean surface Fig. 5: With the retaining bolts removed, take the thermostat and housing out of the engine compartment, and place on a clean surface 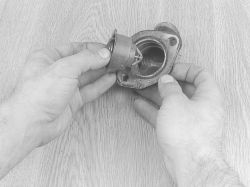 Fig. 6: Remove the thermostat from the housing. Remember the direction in which it was installed Fig. 6: Remove the thermostat from the housing. Remember the direction in which it was installed

|
|
| |
|
| | |
|
