|

|
1983 Volvo 760 GLE 6 cyl (B28F) - size and location of freeze plugs
|
|
|
| |
|
|
JanineC
Anonymous Poster
jerrys_daughter@yahoo.com
Mar 20, 2009, 8:55 AM
Post #1 of 4
(3125 views)
|
 1983 Volvo 760 GLE 6 cyl (B28F) - size and location of freeze plugs
|
Sign In
|
|
Help! I have a 1983 Volvo 760 GLE (6 cyl B28F) that is leaking water terribly. It is not the water pump, radiator or hoses. It seems to be the freeze plugs but I cannot find any information about them for this engine model. Does anyone know what size they are and where they are located (esp. on the passenger side)? Any help would be GREATLY appreciated! Thanks! Janine 
|
|
| |
|
|
Tom Greenleaf
Ultimate Carjunky
/ Moderator

Mar 20, 2009, 10:24 AM
Post #2 of 4
(3121 views)
|
|
Re: 1983 Volvo 760 GLE 6 cyl (B28F) - size and location of freeze plugs
|
Sign In
|
|
Freeze/core/frost plugs - all three names used are somewhat generic for engines of all sorts. They are plugs punched in when completing the manufacture of the assorted areas of the block of the engine and heads as well. There can be quite a few and some may require major parts removed to get access or entire engine removed to do them all!
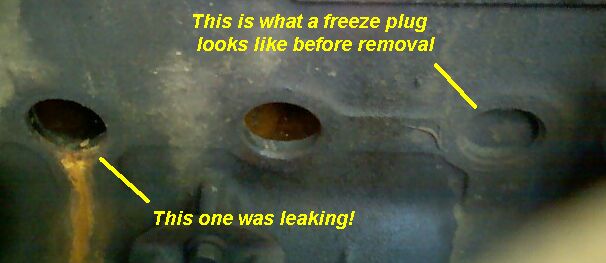
A generic pic below show left to right, one active leak, one already out and one still and and not an issue yet in the pic which is generic - not Volvo specific. When and if you find one or more you can just ask at a parts place or match up by size. There would likely be two or more sized used depending on where they are.
You should pressure test the cooling system and do everything possible to see what is actively leaking before jumping to any conclusions on whether it's these or not. A couple might be completely out of sight and quite difficult to be certain without some real work.
They do make assorted rubber and metal ones that can be screwed with a bolt/nut in tough location some with the old rusted one still in place.

That's one example of an expanding rubber one. It's a hack fix but if one is bad others are likely to come along and leak as well meaning doing them all would be a suggestion. At the age and other considerations you decide on the approach.
These parts are just round plugs and I couldn't find a diagram showing where every one was located on this or any engines in one nice pic. They range from a buck to a few bucks each and the temp fix ones are more. Dorman once made the best crank in copper patch plug that I knew of looking like this when all apart and they were all metal and as said can sometimes size up the right one and go inside the bad one while still in place,

T

(This post was edited by Tom Greenleaf on Mar 20, 2009, 10:27 AM)
|
|
| |
|
|
JanineC
Anonymous Poster
jerrys_daughter@yahoo.com
Mar 20, 2009, 12:19 PM
Post #3 of 4
(3118 views)
|
|
Re: 1983 Volvo 760 GLE 6 cyl (B28F) - size and location of freeze plugs
|
Sign In
|
|
Thanks Tom! You mentioned that you did see some of the plugs on pictures of the engine. Was that an engine like mine? If so, can you possibly share them with me? If I could just see one or two of them on an engine like mine, it might help.
By the way, I love the picture! 
Thanks again!
|
|
| |
|
|
Tom Greenleaf
Ultimate Carjunky
/ Moderator
Mar 20, 2009, 3:34 PM
Post #4 of 4
(3112 views)
|
|
Re: 1983 Volvo 760 GLE 6 cyl (B28F) - size and location of freeze plugs
|
Sign In
|
|
I'm just searching "Images" and can't target your exact engine as a variety show up. They aren't exactly great conversation at a cocktail party for most folks - laugh!
Here's some more that may show you how typical they are no matter what the make....

That won't be a happy Jag owner!
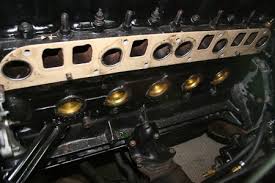
That's some in line (straight six) or one side of a V12 with brass ones shown!
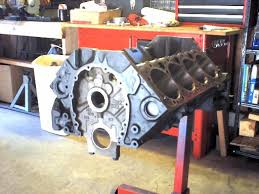
That show a V8 just the block and the silver dollar like thing
to the right under the bore of a cylinder is a freeze plug.

That's one new and brass coated at least. They are available in junk
steel thru brass or a mix of metals depending on spec for engine.

That shows one of those rubber ones. As you tighten that nut
the rubber expands and seals the hole.

There's a neat assortment. Some aren't like a pan but rather a
humped up disc that when pounded stretches to grab tight.
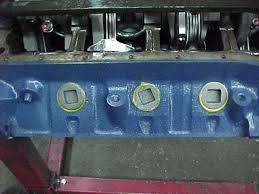
Those are threaded in ones for the really
"anal retentive" engine owner. May be factory on some
but I haven't seen or noticed any.
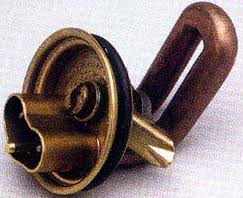
That's a heater that would be installed where a freeze
plug was and when power is added with a house current
power and plug would heat the coolant for cold weather
vehicles that need some help to start or owner's who
just want their engine warm sooner.
~~~~~~~~~~~
The name "freeze plug" is not really accurate as people think they are there to
protect your engine in case of freezing solid with ice. That was true for some (like pre WWII) and
some will pop out if frozen but the real reason is a hole needed to make
the casting of the part when new. They could pop out from freezing and still crack the engine!
The better but unused name for them
is "core plug" and they are used in assorted casted parts - automotive or
otherwise. Cast parts are poured into sand as in "Cast Iron" and the holes
are needed to blow the sand out, seal them up and finish the machine work
on a raw cast part.
~~~~~~~
In automotive engines the most common reason they fail is rusting from the inside.
That can somewhat be blamed on neglect of changing antifreeze with new and the
anti corrosive additives in the new coolant. Some are so damn cheap they'll fail
anyway and some will rust from the outside if the engine isn't greasy enough
to prevent rust! Imagine wanting your engine to be oily or greasy but for the most
part it helps prevent rust on parts!
That was lots more than you probably wanted to know about the little suckers
but what the hey - somebody has to tell the world what they are. They can be
behind or back side of an engine and covered up by the transmission bell housing
requiring removal of the trans to get an old one out or to even take a peek at them.
That really stinks for a dollar part it's tons of work. They aren't always so easy to
remove either. You need to punch at them till cockeyed such that you can grab
them with whatever to remove then clean up the machined hole so it will seal
with a replacement. You about never do these things twice in the life of an engine,
These fun facts to know and tell, 'amuse your friends and appall your neighbors'
are brought to you by the volunteer staff here at.....

Just kidding - it's "dress down Friday" here too,
T
|
|
| |
|
| | |
|


.aspx&usg=__2T2v_HEIItd2B948rSWbq36Gw70=&h=492&w=585&sz=20&hl=EN&start=25&sig2=fY6UODM0WPSdqfqH18EPcg&tbnid=1ZASj73It9nMDM:&tbnh=114&tbnw=135&prev=/images%3Fq%3DEngine%2Bfreeze%2Bplugs%26gbv%3D2%26ndsp%3D20%26hl%3DEN%26sa%3DN%26start%3D20&ei=BiDESZKVEtXkmQeQ48TWCw)


