|

|
intake manifold gasket - 97 Pontiac Grand Am
|
|
|
| |
|
|
waterdude
Novice
Dec 10, 2011, 3:08 PM
Post #1 of 11
(3950 views)
|
|
intake manifold gasket - 97 Pontiac Grand Am
|
Sign In
|
|
just getting started & need to relieve the fuel pressure. Can anyone tell me where theres a valve to relieve the fuel pressure.
|
|
| |
|
|
Discretesignals
Ultimate Carjunky
/ Moderator

Dec 10, 2011, 3:52 PM
Post #2 of 11
(3922 views)
|
|
Re: intake manifold gasket - 97 Pontiac Grand Am
|
Sign In
|
|
If it is an intake gasket, it is probably going to be the 3.1L. The pressure test port is on the rear rail by the alternator and power steering pump.
If it is the 2.4L, there is no test port and you'll have to wrap a rag around the fuel supply connector while disconnecting it.
If either engine runs, you can relieve fuel pressure by disconnecting the fuel sender connector down by the gas tank while the engine is idling. The engine will quit when it runs out of gas.
Unless your going to take the injectors out of the rail, you don't need to disconnect the rail on the 3.1L. Once you get the rail unbolted and the fuel supply line unbolted from the bracket on the side of the engine, you can lift and move the rail out of the way without disconnecting it.
Since we volunteer our time and knowledge, we ask for you to please follow up when a problem is resolved.
|
|
| |
|
|
Sidom
Veteran
/ Moderator

Dec 10, 2011, 5:00 PM
Post #3 of 11
(3909 views)
|
|
Re: intake manifold gasket - 97 Pontiac Grand Am
|
Sign In
|
|
2 suggestions off the top of my head.....Don't mix up the push rods (yes it is possible) and if you take the rockers off, be sure to torque them back to specs, overtorquing can ruin the threads and cause big problems down the road...
|
|
| |
|
|
Discretesignals
Ultimate Carjunky
/ Moderator
Dec 11, 2011, 8:16 AM
Post #4 of 11
(3886 views)
|
|
Re: intake manifold gasket - 97 Pontiac Grand Am
|
Sign In
|
|
Exactly Sid, don't get the exhaust and intake pushrods switched. The exhaust push rods are longer than the intake push rods. You get them switched and you'll be putting a camshaft in it.
Another suggestion is to use Fel-pro permadry intake gasket kit. They have a steel carrier instead of plastic. Haven't had one come back as of yet using that design.
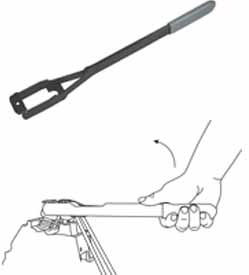
Lisle has come up with a tool (48500), so you don't have to unbolt the rocker arms.
Since we volunteer our time and knowledge, we ask for you to please follow up when a problem is resolved.
(This post was edited by Discretesignals on Dec 11, 2011, 8:21 AM)
|
|
| |
|
|
waterdude
Novice
Dec 11, 2011, 3:28 PM
Post #5 of 11
(3864 views)
|
|
Re: intake manifold gasket - 97 Pontiac Grand Am
|
Sign In
|
|
Slow and go for me. Theres a pipe that threads into the manifold by the thermostat housing that goes to the back the car. It looks like it should come off but I really don't want to screw anything up. Should I un-screw it from the housing or take it off further down where the hose clamp is? Thanks for your help!!!
|
|
| |
|
|
waterdude
Novice
Dec 11, 2011, 3:41 PM
Post #7 of 11
(3852 views)
|
|
Re: intake manifold gasket - 97 Pontiac Grand Am
|
Sign In
|
|
Thanks Hammer!
|
|
| |
|
|
Discretesignals
Ultimate Carjunky
/ Moderator
Dec 11, 2011, 4:56 PM
Post #8 of 11
(3839 views)
|
|
Re: intake manifold gasket - 97 Pontiac Grand Am
|
Sign In
|
|
The coupler where the metal pipe fits into has two plastic ears that you squeeze together to unlock the pipe from the coupler.
Replace the coupler once you have the intake off. They stock ones are cheap pot metal and you'll have a leak later on. If it snaps off trying to unscrew it from the manifold, you can take a hacksaw blade and cut it in three places just above the threads. Then use a small chisel to knock the pieces out.

Since we volunteer our time and knowledge, we ask for you to please follow up when a problem is resolved.
(This post was edited by Discretesignals on Dec 11, 2011, 5:05 PM)
|
|
| |
|
| | |
|
|
Discretesignals
Ultimate Carjunky
/ Moderator
Dec 11, 2011, 8:11 PM
Post #10 of 11
(3814 views)
|
|
Re: intake manifold gasket - 97 Pontiac Grand Am
|
Sign In
|
|
That's a good idea, Sid. I'll have to try that. I usually use a crescent wrench.
Since we volunteer our time and knowledge, we ask for you to please follow up when a problem is resolved.
|
|
| |
|
|
Sidom
Veteran
/ Moderator
Dec 11, 2011, 8:20 PM
Post #11 of 11
(3807 views)
|
|
Re: intake manifold gasket - 97 Pontiac Grand Am
|
Sign In
|
|
It gets into tight areas & you can get the pushrods out while the v/c covers are still on....
On some the 12 is just a bit tight so a 13 works, just fits a bit loose...... Personally I take all the ones that aren't up on the lobes and then roll the motor....but I've seen guys do it without doing that, personally I thing that just puts too much stress on the rockers and bolts but so far haven't seen any problems (yet) with those jobs.....
I didn't even know they make a tool for that now.....
(This post was edited by Sidom on Dec 11, 2011, 8:20 PM)
|
|
| |
|
