|

|
|
Oil Leak 2002 Chevy Venture 3.4 FWD
|
|
|
| |
|
|
MarineGrunt
Enthusiast

Nov 10, 2012, 11:22 AM
Post #1 of 33
(14041 views)
|
|
Oil Leak 2002 Chevy Venture 3.4 FWD
|
Sign In
|
|
Most know that I'm currently rebuilding the tranny on the Venture. I know the oil pan was leaking from the gasket so pulled the pan. It looks like there's oil leaking from a few other spots. I did the intake about 8 months ago so everything from the intake up should be fine. It looks like it's coming from a gasket behind the, bear with me here on part names, but the aluminum body that is behind all of the pulleys. It almost looks like there's a tiny bit of seepage around the head gaskets although that could be from something leaking down in the past. I posted some pictures so hopefully you'll be able to help me identify any leaks. I can wait on the leaks if they gaskets are still somewhat easy to get to with the tranny back in. I know the oil pan gasket is easier with the tranny so that is being replaced now. It looks like the other gaskets and seals would be okay to get to with the tranny in. What do you recommend? Replace the ones I need to now or what until the tranny is back in? I've always wanted to rebuild an engine. Maybe I'll do that next.....haha The most I've ever done to an engine was a head in a 94 Sunbird. I've never had an engine out though.
Just so you know. The oil pan is currently off.
This is looking up on the back right hand side of the engine.
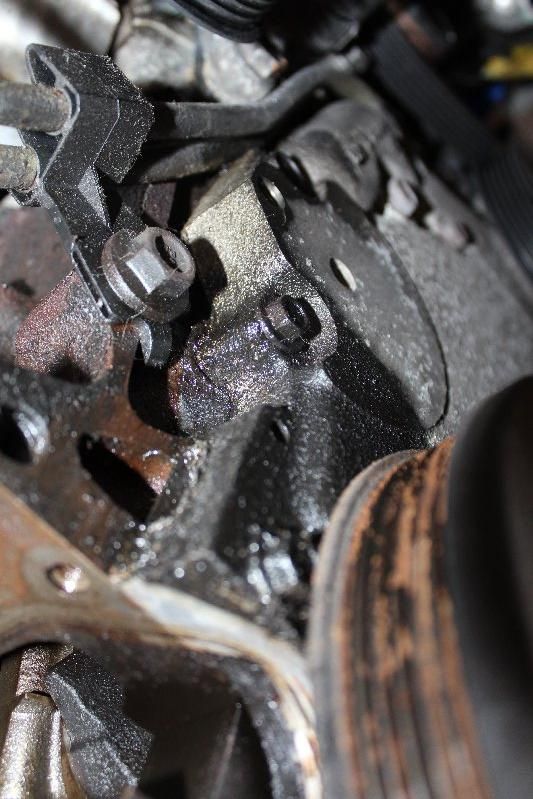
Same as above just zoomed out a little.
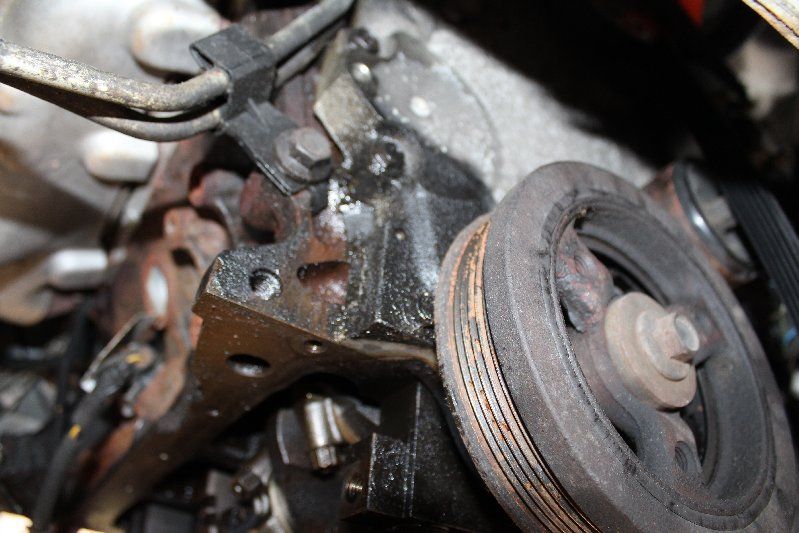
Front right of the engine.
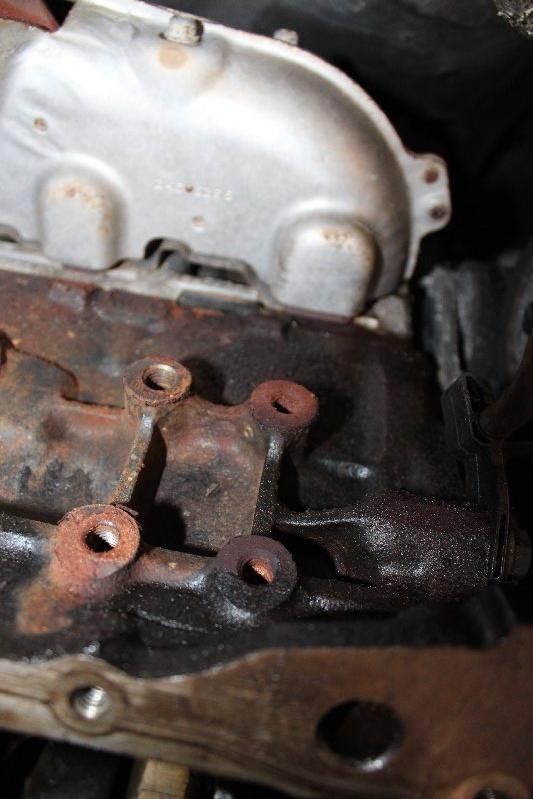
Back right of engine. It looks like there may be a little seepage from the head gasket but not much at all. It could just be from the valve cover before I did the intake. I'll try and get a better picture to post.
(This post was edited by MarineGrunt on Nov 10, 2012, 11:23 AM)
|
|
| |
|
|
Discretesignals
Ultimate Carjunky
/ Moderator

Nov 10, 2012, 11:28 AM
Post #2 of 33
(14025 views)
|
|
Re: Oil Leak 2002 Chevy Venture 3.4 FWD
|
Sign In
|
|
Does the crankshaft front seal look like it is leaking and blowing back and up around the timing cover?
Since we volunteer our time and knowledge, we ask for you to please follow up when a problem is resolved.
|
|
| |
|
|
MarineGrunt
Enthusiast
Nov 10, 2012, 11:31 AM
Post #3 of 33
(14022 views)
|
|
Re: Oil Leak 2002 Chevy Venture 3.4 FWD
|
Sign In
|
|
It looks like there's a paper gasket behind the timing cover. Just to make sure, the aluminum cover behind all the pulleys is the timing cover, correct?
|
|
| |
|
|
Discretesignals
Ultimate Carjunky
/ Moderator
Nov 10, 2012, 11:35 AM
Post #4 of 33
(14017 views)
|
|
Re: Oil Leak 2002 Chevy Venture 3.4 FWD
|
Sign In
|
|
Yep, that is the timing cover. If it appears the timing cover is leaking, it is a lot easier to deal with when the oil pan is off. If you do end up removing the cover, it is a good idea to replace the timing chain and components. If you can overhaul a transmission, rebuilding an engine is cakewalk.
Since we volunteer our time and knowledge, we ask for you to please follow up when a problem is resolved.
(This post was edited by Discretesignals on Nov 10, 2012, 11:36 AM)
|
|
| |
|
|
MarineGrunt
Enthusiast
Nov 10, 2012, 11:35 AM
Post #5 of 33
(14016 views)
|
|
Re: Oil Leak 2002 Chevy Venture 3.4 FWD
|
Sign In
|
|
I guess I didn't really answer your question. I guess it could be possible but looks like it's coming from that paper gasket behind the timing cover.
Could I just wait on this or would it be easier with the tranny out? I picked up a rear main seal but not sure where it goes and couldn't find it in alldata. I'm thinking I should replace the paper gasket and the crankshaft seal. What do you think? I'd rather wait until the tranny is back in unless you recommend doing it now.
|
|
| |
|
|
MarineGrunt
Enthusiast
Nov 10, 2012, 11:42 AM
Post #6 of 33
(14009 views)
|
|
Re: Oil Leak 2002 Chevy Venture 3.4 FWD
|
Sign In
|
|
Sounds good. Off to CARQUEST. Thanks DS.
|
|
| |
|
|
Discretesignals
Ultimate Carjunky
/ Moderator
Nov 10, 2012, 11:47 AM
Post #7 of 33
(14003 views)
|
|
Re: Oil Leak 2002 Chevy Venture 3.4 FWD
|
Sign In
|
|
You have to remove the flex plate(flywheel) to get to the rear main seal on the engine.
If you remove the flexplate, make sure you mark its position, so it goes back on in the same place. Some flywheels can only be clocked a certain way, but on some others it can have multiple positions. It won't make a difference on that engine because the interrupter is in the middle of the crank, but it is common standardized practice to clock them in the same position they came off. The reason is is some engines use the flywheel/flex plate as the crankshaft sensor interrupter. Getting the flywheel clocked in a different position throws the crankshaft signal out of time with the actual crankshaft's position. (just some FYI)
Since we volunteer our time and knowledge, we ask for you to please follow up when a problem is resolved.
(This post was edited by Discretesignals on Nov 10, 2012, 11:50 AM)
|
|
| |
|
|
MarineGrunt
Enthusiast
Nov 10, 2012, 12:07 PM
Post #8 of 33
(13989 views)
|
|
Re: Oil Leak 2002 Chevy Venture 3.4 FWD
|
Sign In
|
|
Thanks DS. I don't only like fixing my vehicles but also like to know why and how something works. I always appreciated your explanations.
|
|
| |
|
|
Discretesignals
Ultimate Carjunky
/ Moderator
Nov 10, 2012, 12:12 PM
Post #9 of 33
(13988 views)
|
|
Re: Oil Leak 2002 Chevy Venture 3.4 FWD
|
Sign In
|
|
Well, if you ever do a rear main on something like a Volvo that is good information to know. 
Since we volunteer our time and knowledge, we ask for you to please follow up when a problem is resolved.
(This post was edited by Discretesignals on Nov 10, 2012, 12:12 PM)
|
|
| |
|
|
MarineGrunt
Enthusiast
Nov 10, 2012, 12:33 PM
Post #10 of 33
(13984 views)
|
|
Re: Oil Leak 2002 Chevy Venture 3.4 FWD
|
Sign In
|
|
The gasket kit, with crankshaft seal, only cost me $9.00. That's what I like to see.
When I took the radiator cap off I noticed quite a bit of rubbery sludge on the cap and on the sides of the neck of the radiator. I replaced the antifreeze when I did the intake and didn't really notice as much sludge. I've never added any kind of stop leak or anything but I'm not sure about a previous owner. We've had the van since 2006. Should I give it a good flush or replace the radiator?
|
|
| |
|
|
nickwarner
Veteran
/ Moderator

Nov 10, 2012, 1:01 PM
Post #11 of 33
(13981 views)
|
|
Re: Oil Leak 2002 Chevy Venture 3.4 FWD
|
Sign In
|
|
Give it a good flush. When your intake was bad it can contaminate the oil. Take the surge tank out and put hot water and degreaser in it. Bleieve it or not Dawn dish soap gets this out nicely. If you have a long baby bottle brush left over from the kids early years get that in there and scrub. Now if this coolant has contamination in it from oil you will need to flush it out. I would first pressure test it. With your trans not in it the lines are unhooked and this would be a great time to be sure your trans heat exchanger inside the radiator isn't cross contaminating. Put the cooling system up to pressure and see if any antifreeze comes out the cooler lines of the trans. If so, change the radiator and flush the system.
Everyone has their preferred product to clean the residue out. I use Simple Green or Jungle Jake to do it. You put about 1/2 gallon of it in the system, top it off with water, and run the engine for about 25-30 minutes at 2000 RPM. Then idle down for two minutes and drain. Fill up with clean water and repeat until the water comes out clean. Then add half the amount of your cooling system capacity of pure antifreeze. Finish filling with water. Some water will remain in the block, which is why you want to add straight coolant first so when all is said and done you will have a 50/50 mix.
The advantage with Simple Green and Jungle Jake is they are biodegradeable, so if it goes down the driveway into some plants or a sewer its not hurting anything. It also smells good, and in a shop something that smells nice is hard to come by so a pleasant change. Also doesn't hurt that you can get the stuff pretty much everywhere. Most radiator flushes are made to remove scale deposits and rust. They aren't that great as degreasers.
Here's the info on the rear main seal.
Print
Removal & Installation
The transaxle assembly must be removed to perform this service. This requires special tooling to support the engine assembly while the transaxle and sub-frame are lowered from under the vehicle. - Before servicing the vehicle, refer to the Precautions Section.
- Remove or disconnect the following:
WARNING When removing the seal, use care so that no damage occurs to the crankshaft. Once the seal is removed, inspect the crankshaft surface for any nicks or burrs. Repair or replace crankshaft as necessary.
Negative battery cable Transmission assembly Engine flywheel Oil seal
To install:
  
Fig. Use the correct installation tool when replacing the rear seal
- Install or connect the following:
New oil seal lubricated with engine oil, using an Oil Seal Installer tool J 34686 until it is seated properly over the crankshaft Flywheel Transmission assembly Negative battery cable
- Start the vehicle and check for leaks, repair if necessary.
- Before servicing the vehicle, refer to the Precautions Section.
- Remove or disconnect the following:
NOTE Be careful not to damage the crankshaft seal surface with the prying tool.
Negative battery cable Transmission assembly Flywheel Crankshaft seal by prying it from out oil seal housing
To install:

Fig. Indicating the proper orientation of the rear main seal during installation
CAUTION Note the direction of the rear oil seal. The new design seal is a reverse style as opposed to what has been used in the past. "THIS SIDE OUT" has been stamped into the seal.
NOTE Do not apply or use any oil lubrication on the crankshaft rear oil seal or the seal installer. Do not touch the sealing lip of the oil seal once the protective sleeve is removed. Doing so will damage or deform the seal. Clean the crankshaft sealing surface with a clean, lint free towel. Inspect the edge of crankshaft for burrs or sharp edges that could damage the rear main oil seal. Remove burrs or sharp edges with a crocus cloth.
- Install the new rear seal by using a seal installer.
- Install or connect the following:
Flywheel Transmission assembly Negative battery cable
- Start the engine and check for leaks.
For the timing cover, this is what you need
Removal & Installation
- Before servicing the vehicle, refer to the Precautions Section.
- Drain the engine oil.
- Drain the coolant.
- Remove or disconnect the following:
Negative battery cable Crankshaft balancer Drive belt tensioner Power steering pump and lines. Do not disconnect the lines from the pump Thermostat bypass pipe from the front cover Radiator outlet hose from the water pump Water pump Upper and lower Crankshaft Position (CKP) sensor wire harness bracket from the front cover CKP sensor from the front cover Front cover and gasket

Fig. Crankshaft timing mark locations
- Rotate the crankshaft until the timing marks are aligned in the following locations:
Camshaft alignment pin (1) Timing chain damper (2) to the crankshaft sprocket (3) Crankshaft key (4) Timing chain damper (5) to the camshaft sprocket locator hole (6)
- Remove or disconnect the following:
Camshaft sprocket bolt Timing chain, timing chain sprockets and damper Front oil seal

Fig. Exploded view of the timing chain assembly
To install: - Install or connect the following:
New front oil seal by making certain the seal is fully seated Timing chain damper. Torque the bolts to 15 ft. lbs. (21 Nm). Timing chain to the camshaft sprocket Crankshaft sprocket Timing chain to the crankshaft sprocket by making certain the chain is fully seated
- Align the crankshaft timing mark to the bottom mark on the damper.
- Align the timing mark on the camshaft gear center line of the locator hole with the timing mark on the top of the damper.
- Align the dowel in the camshaft with the dowel hole in the camshaft sprocket.
- Install or connect the following:
Camshaft sprocket bolt. Torque the bolt to 103 ft. lbs. (140 Nm).
- Apply a 0.20 inch (5mm) bead of sealer to both sides of the lower tabs of the engine front cover gasket.
Front cover. Torque the 5 small bolts to 15 ft. lbs. (21 Nm), the 3 large bolts to 41 ft. lbs. (55 Nm) and the 2 remaining bolts to 35 ft. lbs. (47 Nm). Water pump to the front cover. Torque the bolts to 89 inch lbs. (10 Nm). Water pump pulley. Torque the bolt to 18 ft. lbs. (25 Nm). CKP sensor to the front cover Upper/lower CKP wire harness brackets to the front cover Radiator outlet hose to the water pump Thermostat bypass pipe to the front cover Power steering pump and lines Drive belt tensioner Crankshaft balancer Negative battery cable
- Fill the engine with oil.
- Fill the coolant system.
|
|
| |
|
|
MarineGrunt
Enthusiast
Nov 10, 2012, 1:23 PM
Post #12 of 33
(13977 views)
|
|
Re: Oil Leak 2002 Chevy Venture 3.4 FWD
|
Sign In
|
|
Thanks for the great description. It's 70 degrees out today so figured today was a good time to take care off the other crap. I pulled the tranny out in the drive so I had more room in the garage. I can't wait until we purchase some land so I can build me a nice garage!
Good old Simple Green. We used the heck out of that stuff in the Marine Corps. Good stuff.
Can I get away with installing the rear main seal without the special tool as long as I'm careful that it lines up okay?
I'm about 99% sure that the timing cover gasket is the main cause of the seeping oil. It's wet all along the outside of it. I wish I would've replaced it when I did the intake.
|
|
| |
|
|
Tom Greenleaf
Ultimate Carjunky
/ Moderator

Nov 10, 2012, 4:06 PM
Post #13 of 33
(13960 views)
|
|
Re: Oil Leak 2002 Chevy Venture 3.4 FWD
|
Sign In
|
|
Degreaser favs for finding a leak I've had luck with specific to just what and where not mentioned yet,
* Westley's Bleche-Wite by brand. Not sure what else but can harm asphalt.
* Lanolin like the 'agent orange' type hand cleaners.
* No surprise but WD-40 (mostly fish oil) depending on where. So far will not harm painted things.
Other more serious totally nasty XXX
* Marine Hull cleaner - brush (nylon brush only) on and anything organic or rust will smoke! Keep that crap away from anything but specific items! I think it's oxalic acid or sulfuric acid.
* Some Brake-Kleen type products are mostly lacquer thinner. Watch out for paint again and rubber items.
* XXXX and AYOR - Marker's Mark! Call hazmat squad to be on standby ! !
New ordinary gaskets: Like Felpro products. If paperish for oil sealing will use black Permatex gasket maker in the finest smear (no build up) and allow to fully dry..........
T
|
|
| |
|
|
MarineGrunt
Enthusiast
Nov 10, 2012, 5:22 PM
Post #14 of 33
(13951 views)
|
|
Re: Oil Leak 2002 Chevy Venture 3.4 FWD
|
Sign In
|
|
What's the trick to getting the old paper gasket off in such a tight space? It is really stuck on there. Can I spray that gasket remover?
Tom, are you saying to smear the rtv, let it dry, and then put the gasket on top or smear the rtv on both sides of the gasket, let it dry, and then install?
Have to take the wife out for the evening so will be back at it tomorrow.
|
|
| |
|
|
nickwarner
Veteran
/ Moderator
Nov 10, 2012, 6:45 PM
Post #15 of 33
(13946 views)
|
|
Re: Oil Leak 2002 Chevy Venture 3.4 FWD
|
Sign In
|
|
Gasket remover will loosen it up. Die grinder with a roloc disc gets at it pretty good on the block, but timing cover is aluminum so a very delicate touch is needed. I think Tom means you should rub a small film of RTV on the cover, place the gasket on it and allow it time to cure. Then rub a small film on the other side just before you bolt it up and let that sit a few hours before you fire it up.
You can install the rear main without the installer but you have to be very careful and have to fabricate your own puller. I made one for the front seal of an N14 at work out of pipe and flat stock. You need a piece of pipe that just barely fits over the crank. Cut off a piece and weld flat bar across one end of it. Drill two or more holes in that bar that match your crankshaft bolt pattern. Once you get the seal onto the crank and lined up, place your installer over the crank and use the crank bolts to pull the tool into the seal. Absolute diligence must be exercised to make sure it is going in straight. Also realize that a crude homemade tool will not have a positive stop, so you must know exactly how deep to install this.
With both the front and rear main seal, be sure to look very closely at the crank mating surface. Strange as it is, that rubber seal lip can and will cut into your hardened steel crank and if you have damage you will need a speedi-sleeve seal setup or this will never seal up properly.
|
|
| |
|
|
Tom Greenleaf
Ultimate Carjunky
/ Moderator
Nov 11, 2012, 2:15 AM
Post #16 of 33
(13932 views)
|
|
Re: Oil Leak 2002 Chevy Venture 3.4 FWD
|
Sign In
|
|
RTV? Conjures the question which one as by brand "Permatex" there are many in assorted colors. Plain black (other colors seen out there) marked gasket maker vs the "adhesive sealant" easily mistaken.
What I mean is for paper or some other assorted gaskets anywhere just to color the new gasket with the stuff which is NOT necessary by the book at all but noted that the paper itself can and will leak thru coolants, oils just a bit then quit. Maybe just me but I like to pressure up a cooling system with tester while just air is inside and spray some soapy water to verify the seal is good. Yup, even properly done with just air you get that shaving cream like it's leaking but wont with the coolant later. Doesn't matter if timing cover stuff, intakes that run coolant or what I like to know it's OK before it is all back together.
Other is once a gasket of those types has that junk on it it will never be a nightmare to deal with again and just peel off. Before electricity old pharts would use grease. Still would but silicone - pure stuff. Hard to find but use it in/on many assorted things never to be soldered or painted later. Threaded studs & bolts. This anal behavior is for the next possible chance you are there again it will behave like it should have been made to begin with but just can't be. You get one shot when there to make it last,
Tom
|
|
| |
|
|
Hammer Time
Ultimate Carjunky
/ Moderator

Nov 11, 2012, 7:20 AM
Post #17 of 33
(13926 views)
|
|
Re: Oil Leak 2002 Chevy Venture 3.4 FWD
|
Sign In
|
|
I'll throw my 2 cents worth in here.
What i do is I use a thin spray adhesive on the surface of the new part and cement the gasket to it and then right before installing it, I apply a coat of RTV too the engine side. That way that gasket stays firmly in place on the part and will not move during installation and if ever removed again, the setup will make the gasket remain on the removed part and make clean up easier. The RTV will also fill any pitting you may have on the block. If the cover has any pitting, it should be replaced and it likely will have.
~~~~~~~~~~~~~~~~~~~~~~~~~~~~~~~~~~~~~~~~~~~~~~~~~~~~~~~~~~~~~~~~~~~~
We offer help in answering questions, clarifying things or giving advice but we are not a substitute for an on-site inspection by a professional.
(This post was edited by Hammer Time on Nov 11, 2012, 7:21 AM)
|
|
| |
|
|
MarineGrunt
Enthusiast
Nov 11, 2012, 11:43 AM
Post #18 of 33
(13918 views)
|
|
Re: Oil Leak 2002 Chevy Venture 3.4 FWD
|
Sign In
|
|
Thanks for the advice HT. I didn't notice any pitting on the timing cover so I think I'm okay to reuse it.
Another question. Is the crankshaft seal on the timing cover or is there another seal behind the crankshaft sprocket?
(This post was edited by MarineGrunt on Nov 11, 2012, 11:45 AM)
|
|
| |
|
|
Hammer Time
Ultimate Carjunky
/ Moderator
Nov 11, 2012, 11:46 AM
Post #19 of 33
(13913 views)
|
|
Re: Oil Leak 2002 Chevy Venture 3.4 FWD
|
Sign In
|
|
No, that is all oil lubricated behind the cover. Seal is in the cover.
~~~~~~~~~~~~~~~~~~~~~~~~~~~~~~~~~~~~~~~~~~~~~~~~~~~~~~~~~~~~~~~~~~~~
We offer help in answering questions, clarifying things or giving advice but we are not a substitute for an on-site inspection by a professional.
|
|
| |
|
|
MarineGrunt
Enthusiast
Nov 11, 2012, 12:26 PM
Post #20 of 33
(13907 views)
|
|
Re: Oil Leak 2002 Chevy Venture 3.4 FWD
|
Sign In
|
|
Great....thanks HT!
|
|
| |
|
|
MarineGrunt
Enthusiast
Nov 11, 2012, 12:41 PM
Post #21 of 33
(13902 views)
|
|
Re: Oil Leak 2002 Chevy Venture 3.4 FWD
|
Sign In
|
|
When I'm cleaning up the surface on the engine am I okay to spray the gasket remover and parts cleaner without worrying about it getting into any certain spots? I'm going to flush the cooling system when finished but didn't know about the engine. Will spraying it hurt anything if it does get into any spots it shouldn't be?
|
|
| |
|
|
Hammer Time
Ultimate Carjunky
/ Moderator
Nov 11, 2012, 12:52 PM
Post #22 of 33
(13899 views)
|
|
Re: Oil Leak 2002 Chevy Venture 3.4 FWD
|
Sign In
|
|
Not at long as you change the oil when you're finished, You would be better using a scraper instead.
~~~~~~~~~~~~~~~~~~~~~~~~~~~~~~~~~~~~~~~~~~~~~~~~~~~~~~~~~~~~~~~~~~~~
We offer help in answering questions, clarifying things or giving advice but we are not a substitute for an on-site inspection by a professional.
|
|
| |
|
|
MarineGrunt
Enthusiast
Nov 11, 2012, 2:11 PM
Post #23 of 33
(13893 views)
|
|
Re: Oil Leak 2002 Chevy Venture 3.4 FWD
|
Sign In
|
|
Scraper it is.
I'm pretty sure this will be the last minivan we will own. I'm not a big fan of working on them. I like how alldata says, "Remove the power steering pump with lines. Move the power steering pump to the side'" Yeah right, where the hell is the room to move it to the side? I just pretty much left it in place and wiggled the timing cover off. But hey, I've done enough work on this thing to where I'm getting the hang of working on it. It has been a good vehicle though. I didn't have to touch anything, besides the condenser and compressor, until we hit 140k. I can live with that.
Thanks again for the help HT. Always appreciated.
|
|
| |
|
|
Hammer Time
Ultimate Carjunky
/ Moderator
Nov 11, 2012, 2:14 PM
Post #24 of 33
(13890 views)
|
|
Re: Oil Leak 2002 Chevy Venture 3.4 FWD
|
Sign In
|
|
The pump is pretty easy to remove. There are 3 10mm bolts that can be access through the hole in the pulley and then the pump will slide right out of the bracket with pulley and all.
~~~~~~~~~~~~~~~~~~~~~~~~~~~~~~~~~~~~~~~~~~~~~~~~~~~~~~~~~~~~~~~~~~~~
We offer help in answering questions, clarifying things or giving advice but we are not a substitute for an on-site inspection by a professional.
|
|
| |
|
|
MarineGrunt
Enthusiast
Nov 11, 2012, 2:42 PM
Post #25 of 33
(13886 views)
|
|
Re: Oil Leak 2002 Chevy Venture 3.4 FWD
|
Sign In
|
|
I already got it off. I was just saying how the manual says to move it to the side but there's hardly any room to move it to the side. There's hardly any room at all in a minivan engine compartment.
Is Ultra Grey okay to use? I can't seem to find my black. I know I have some somewhere though so will find it if need be.
|
|
| |
|
