|

|
98 mercury sable U engine. Spraying coolant out of engine on driver side.
|
|
|
| |
|
|
Wesdod151
Novice
Dec 3, 2015, 12:47 PM
Post #1 of 22
(2393 views)
|
|
98 mercury sable U engine. Spraying coolant out of engine on driver side.
|
Sign In
|
|
Its spraying coolant out of the driver side of the engine. Also quite a bit of white smoke out of the exhaust. No milkshake oil. Overheating (obviously) and misfire. I haven't had it scanned. Any tip and suggestions would be great. I was thinking its the head gaskets but i really dont know. If i find a repair ill post it on here. This is the U model. Not dohc it looks like its coming out of a small hole on the engine several inches below the coil pack.
|
|
| |
|
|
Wesdod151
Novice
Dec 3, 2015, 12:49 PM
Post #2 of 22
(2391 views)
|
|
Re: 98 mercury sable U engine. Spraying coolant out of engine on driver side.
|
Sign In
|
|
Theres something wrong with file upload. It taking me to a page called http://autoforums.carjunky.com/photos/login.php sorry if im doing it wrong.
|
|
| |
|
|
Tom Greenleaf
Ultimate Carjunky
/ Moderator

Dec 3, 2015, 1:49 PM
Post #3 of 22
(2382 views)
|
|
Re: 98 mercury sable U engine. Spraying coolant out of engine on driver side.
|
Sign In
|
|
Try a host site like Photobucket and link to the picture(s) works for many.
Awful hard to say if not obvious to you just looking. Smoke out exhaust for sure is damning for head gasket. To avoid a mistake if coolant or not see what might be coming out tailpipe.
IDK - spraying outside on driver's side? Alone might say a "freeze" plug but it's a bit new for that.
Other: Did this happen all at once AFTER a pretty hard freeze and no antifreeze by any chance?
T

|
|
| |
|
|
Discretesignals
Ultimate Carjunky
/ Moderator

Dec 3, 2015, 3:32 PM
Post #4 of 22
(2375 views)
|
|
Re: 98 mercury sable U engine. Spraying coolant out of engine on driver side.
|
Sign In
|
|
Have you actually tried to look and see exactly were it is spraying out from? There is a radiator hose, heater hose, and thermostat housing on that side of the engine.
Since we volunteer our time and knowledge, we ask for you to please follow up when a problem is resolved.
|
|
| |
|
|
Hammer Time
Ultimate Carjunky
/ Moderator

Dec 3, 2015, 6:08 PM
Post #5 of 22
(2370 views)
|
|
Re: 98 mercury sable U engine. Spraying coolant out of engine on driver side.
|
Sign In
|
|
White smoke and misfire. That sure sounds like a blown head gasket.
~~~~~~~~~~~~~~~~~~~~~~~~~~~~~~~~~~~~~~~~~~~~~~~~~~~~~~~~~~~~~~~~~~~~
We offer help in answering questions, clarifying things or giving advice but we are not a substitute for an on-site inspection by a professional.
|
|
| |
|
|
Wesdod151
Novice
Dec 3, 2015, 9:39 PM
Post #6 of 22
(2359 views)
|
|
Re: 98 mercury sable U engine. Spraying coolant out of engine on driver side.
|
Sign In
|
|
I know this is a bad pick the was ALOT of vapor blowing out of it, ill take another one tomorrow. Ill try and get one of just the hole its a tough spot to take a pic. http://s1175.photobucket.com/user/Wes_Nelson/media/Mobile%20Uploads/20151203_105238_zpsji9wyemg.jpg.html?sort=3&o=0
|
|
| |
|
|
Discretesignals
Ultimate Carjunky
/ Moderator
Dec 4, 2015, 5:36 AM
Post #7 of 22
(2347 views)
|
|
Re: 98 mercury sable U engine. Spraying coolant out of engine on driver side.
|
Sign In
|
|
That's a gusher. Can you zoom out? It's really hard to tell where that is.
Since we volunteer our time and knowledge, we ask for you to please follow up when a problem is resolved.
(This post was edited by Discretesignals on Dec 4, 2015, 5:36 AM)
|
|
| |
|
|
Wesdod151
Novice
Dec 5, 2015, 8:49 AM
Post #8 of 22
(2325 views)
|
|
Re: 98 mercury sable U engine. Spraying coolant out of engine on driver side.
|
Sign In
|
|
Here are some more pics hopefully there a little better
http://s1175.photobucket.com/user/Wes_Nelson/media/Mobile%20Uploads/20151205_102937_zps2166z5yy.jpg.html?filters[user]=144378344&filters[recent]=1&sort=1&o=1
(This post was edited by Discretesignals on Dec 5, 2015, 9:55 AM)
|
|
| |
|
|
Discretesignals
Ultimate Carjunky
/ Moderator
Dec 5, 2015, 9:54 AM
Post #9 of 22
(2320 views)
|
|
Re: 98 mercury sable U engine. Spraying coolant out of engine on driver side.
|
Sign In
|
|
Looks like you have a freeze plug that rotted out. Doesn't look too hard to replace once you get the bracket out of the way. It appears that your coolant system is really rusty and wasn't maintained very well. You might want to flush the system out as much as you can after replacing the plug, and then put some fresh coolant in. It may take multiple flushings.
Since we volunteer our time and knowledge, we ask for you to please follow up when a problem is resolved.
(This post was edited by Discretesignals on Dec 5, 2015, 9:56 AM)
|
|
| |
|
|
Wesdod151
Novice
Dec 5, 2015, 10:24 AM
Post #10 of 22
(2315 views)
|
|
Re: 98 mercury sable U engine. Spraying coolant out of engine on driver side.
|
Sign In
|
|
Ok, thanks for the info im buying right now. Second question, so im pretty certain that heads are still gonna have to be done. The problem is that i newd to wait for my tax refund and i need to drive it almost daily. Do you think it would be worth to put some gasket sealant in there to hold me until the repair?
|
|
| |
|
|
Discretesignals
Ultimate Carjunky
/ Moderator
Dec 5, 2015, 10:35 AM
Post #11 of 22
(2314 views)
|
|
Re: 98 mercury sable U engine. Spraying coolant out of engine on driver side.
|
Sign In
|
|
Not recommended to put sealer in there. Sealer is just a bandaid fix and can do more damage to the system than anything.
You shouldn't have to remove the cylinder head to replace that plug. Why do you think the heads have to be done?
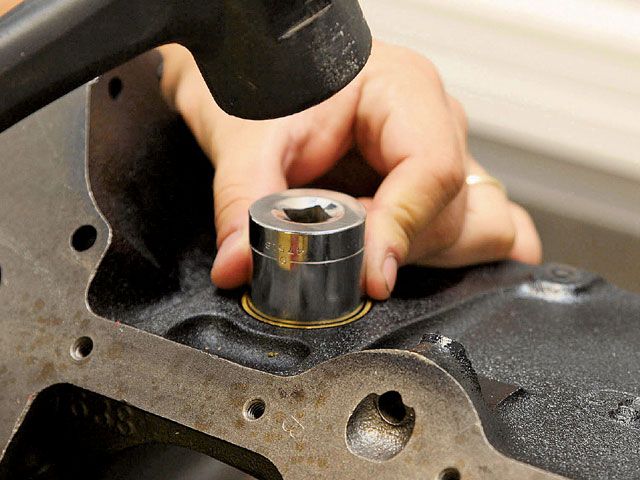
Looks like you just have to remove the bracket that covers that plug. Then pry the plug out and install another one. You could use either a freeze plug installer or use an old socket to pop it in.
Since we volunteer our time and knowledge, we ask for you to please follow up when a problem is resolved.
(This post was edited by Discretesignals on Dec 5, 2015, 10:39 AM)
|
|
| |
|
|
Wesdod151
Novice
Dec 5, 2015, 12:07 PM
Post #12 of 22
(2306 views)
|
|
Re: 98 mercury sable U engine. Spraying coolant out of engine on driver side.
|
Sign In
|
|
I meant to say head gasket, i did already put that new plug on and it did stop the leak
|
|
| |
|
|
Hammer Time
Ultimate Carjunky
/ Moderator
Dec 5, 2015, 12:07 PM
Post #13 of 22
(2305 views)
|
|
Re: 98 mercury sable U engine. Spraying coolant out of engine on driver side.
|
Sign In
|
|
The biggest problem you have is that usually what is happening to one plug is happening to all the others also. There are a large number of plugs and some of them are in places that are very difficult to access so this is likely just the beginning of your troubles. As DS said, the system is a mess because someone was using water instead of coolant and the damage is done now. It does need to be flushed out thoroughly but don't be surprised if that uncovers a few more leaks.
~~~~~~~~~~~~~~~~~~~~~~~~~~~~~~~~~~~~~~~~~~~~~~~~~~~~~~~~~~~~~~~~~~~~
We offer help in answering questions, clarifying things or giving advice but we are not a substitute for an on-site inspection by a professional.
|
|
| |
|
|
Tom Greenleaf
Ultimate Carjunky
/ Moderator
Dec 5, 2015, 1:01 PM
Post #14 of 22
(2302 views)
|
|
Re: 98 mercury sable U engine. Spraying coolant out of engine on driver side.
|
Sign In
|
|
Same point as HT with these. If ONE goes others are soon to go as well. Not many but seems inferior lots of plugs got used now and then as it happened to some that were cared for inside (coolant) and one a few from outside of all things!
Hate to suggest it but I might poke at another easy one when this one gets fixed and if it falls right thru really can take up to taking engine out to get them all. Cheap, fussy but have to have them,
T
|
|
| |
|
|
Wesdod151
Novice
Dec 5, 2015, 1:56 PM
Post #15 of 22
(2294 views)
|
|
Re: 98 mercury sable U engine. Spraying coolant out of engine on driver side.
|
Sign In
|
|
Ill keep that in mind and ill probably buy the other plugs in anticipation of more leaks. I appreciate everyone taking the time to help me sort this out.
|
|
| |
|
|
Tom Greenleaf
Ultimate Carjunky
/ Moderator
Dec 5, 2015, 2:24 PM
Post #16 of 22
(2291 views)
|
|
Re: 98 mercury sable U engine. Spraying coolant out of engine on driver side.
|
Sign In
|
|
Check prices for whole sets vs just one if more are coming.
If the car in general is not worth throwing the bucks at for labor mostly they do make copper plugs to put inside the bad ones that work. I've had luck with those in areas too difficult to get at plus car wasn't expected to go too much longer in general.
These are sometime very easy DIY if you can find them. Posting a pic so you get the idea and hope it shows the first try if not Google Imagages for "Dorman Copper Plugs" came up with them.
Like this............


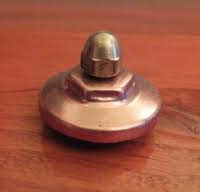
^^^^ Hope one of a few showed. Other styles available too but forget plain rubber they would blow right out.
Measure a new one or buy one. The outer ring stays good usually so you want the I.D. of the new one or old one in place if you can - exactly. Buy the plug shown that is snug and when tightened is permanent. It will NOT come out later easily at all so be sure you want that.
You also have to consider what other possible damage from loss of coolant and or overheating may have already done on top of this.
FYI and doesn't mean for you but had one of these last about 7 years alone just once till vehicle croaked
T
|
|
| |
|
|
Double J
Veteran
/ Moderator

Dec 5, 2015, 4:21 PM
Post #17 of 22
(2284 views)
|
|
Re: 98 mercury sable U engine. Spraying coolant out of engine on driver side.
|
Sign In
|
|
This TSB from Ford kinds sums it up....
TSB
01-11-6
COOLING SYSTEM - 3.0L VULCAN ENGINE ONLY - VARIOUS COOLANT RELATED SYMPTOMS - CONTAMINATED OR DISCOLORED COOLANT Publication Date: MAY 25, 2001
FORD:1996-1999 TAURUS MERCURY:1996-1999 SABLE
NOTE:THIS ARTICLE DOES NOT APPLY TO GULF COAST COUNTRY (GCC) VEHICLES EQUIPPED WITH ENGINE OIL COOLER. A SEPARATE TSB WILL BE RELEASED SOON FOR THESE APPLICATION.
ISSUE:
Some vehicles may exhibit cooling system conditions such as: - Contaminated/corroded coolant
- Leaking/Cracked/Discolored Coolant Overflow bottles
- Vibration or thumping from engine
- Leaking heater core
- Coolant overflow
- High temperature gauge readings
- Fluctuating temperature gauge
- Stuck Thermostat
- Heater hose leaks
- Leaking head gasket
- Lack of heat
This may be caused by:- Coolant level that falls below the cold fill range due to un-serviced leaks, improper fill after service and lack of coolant level maintenance that may lead to cooling system overheat damage.
-
NOTE:IT IS RECOMMENDED THAT THE COOLANT CAN BE SAFELY FILLED TO THE TOP OF THE CLEAR PORTION OF THE BOTTLE (WHEN THE ENGINE IS COLD) TO PROVIDE EXTRA RESERVE COOLANT. (FIGURE 11).
** Bank to bank coolant flow imbalance on some 1996-98 model year vehicles. **
ACTION:
Perform the following repairs based on model year application. Check repair history to determine if prior repairs were performed. - 1996-97 3.0L Vulcan - If bypass kit was previously installed, then install new water pump (1F1Z-8501-AA) and perform the entire SEDIMENT/CHEMICAL FLUSH and fill procedure. If bypass kit was NOT previously installed, Install coolant bypass kit (F7DZ-8522-AB) OR (METHONAL VEHICLES F8DZ-8522-CC), new water pump (1F1Z-8501-AA) and perform the entire SEDIMENT/CHEMICAL FLUSH and fill procedures.
-
- 1998 3.0L Vulcan - Install Coolant bypass kit (F8DZ-8522-BA) on vehicles built 9/1/1997 - 1/23/1998. Install water pump (1F1Z-8501-AA) on all 1998 models regardless of build date. Perform the entire SEDIMENT/CHEMICAL FLUSH if bypass kit was NOT previously installed. If bypass was previously installed or vehicle is outside the coolant bypass build range the CHEMICAL FLUSH and Fill procedure may be sufficient.
-
- 1999 3.0L Vulcan - Perform FLUSH AND FILL PROCEDURE AND CHEMICAL FLUSH ONLY.
SERVICE PROCEDURE
- Perform normal diagnostics as outlined in the Cooling System Symptom charts located in the appropriate model year Workshop Manual. Service as required.
- If not previously installed, install appropriate Coolant By-Pass Kit. Refer to the Instruction sheet included in the kit for details.
- Install water pump on 1996-98 models only. Refer to Workshop manual, Section 03-01A for replacement details.
- Perform the following flush and fill procedures if coolant is discolored.
-
FLUSH AND FILL PROCEDURE RECOMMENDED TOOLS
The tools shown in Figure 1 are referenced throughout the technical Instruction to facilitate the flush procedures. Tools should be obtained locally.
FLUSH AND FILL PROCEDURE
NOTE:POSITION THE VEHICLE ON A HOIST WHERE A GARDEN HOSE CAN BE USED AND COOLANT CAN BE DISCARDED.
WARNING:COOLANT MAY BE HOT. REMOVE COOLANT PRESSURE RELIEF CAP.
- Raise vehicle on hoist.
- Remove splash shield.
- Remove Radiator draincock and completely drain and discard coolant.
- Lower vehicle.
- Loosen alternator brace retaining nuts and position brace away from heater return hose (Figure 2).
- Turn Heater and Blower Switches to off.
- Disconnect heater return hose from water pump and discard clamp.
- FOR 96, 97 AND SOME 98 MODEL YEAR VEHICLES PROCEED WITH THE SEDIMENT AND CHEMICAL FLUSH PROCEDURES. FOR 99 MODEL YEAR, COMPETE THE CHEMICAL FLUSH PROCEDURE ONLY.
-
SEDIMENT FLUSH PROCEDURE
- Disconnect upper radiator hose from thermostat housing and discard clamp.
- Using clamping pliers, clamp off coolant by-pass hose at center of hose (Figure 3).
- Raise and support vehicle.
- Remove engine block core plug located next to the oil filter. On the opposite side of the engine block, there are two core plugs; remove the engine block core plug closest to the water pump.
- Remove lower radiator support bracket that covers lower radiator hose.
- Remove lower radiator hose from radiator and discard clamp.
- Clean core plug bores in cylinder block with sand paper drum (Fine 150-grit 1.5" dia.). Ensure all Loctite and rust is removed from core plug bore.
- Lower vehicle.
- Connect garden hose to heater return hose using adapter (Figure 4).
- Turn garden hose on full pressure.
- Flush engine/heater core for ten (10) minutes. Water will drain out of core plug holes.
- Disconnect garden hose from heater return hose.
- Insert garden hose into upper radiator hose (Figure 5).
- Flush radiator for two (2) minutes. Water will drain out of lower radiator hose connection and draincock.
- Remove garden hose from upper radiator hose.
- Insert garden hose into coolant recovery bottle (Figure 6).
- Flush coolant recovery bottle for four (4) minutes. Water will drain out of lower radiator hose.
- Remove garden hose from coolant recovery bottle. Let cooling system completely drain before proceeding to next step.
- Remove clamping pliers from coolant by-pass hose.
- Install new screw clamp on upper radiator hose. Connect upper radiator hose to thermostat housing and tighten clamp.
- Raise and support vehicle.
- Lubricate O-rings of new engine core plugs (-6C057-) with silicone dielectric grease (WA-10).
- Install left and right bank front engine core plugs. Index dimples on the plugs to 12 o'clock position. (Figure 7).
NOTE:DO NOT OVER TORQUE.
- Tighten core plug retaining nuts to 3.2 N-m (28 lb-in). See Figure 7. Use 1/4" drive, 8mm flex socket with a long extension is acceptable. Make sure plugs do not rotate when tightening retaining nut.
- Install new screw clamp on lower radiator hose. Connect lower radiator hose to radiator and tighten clamp.
- Install lower radiator support bracket. PROCEED TO STEP 36 and continue.
CHEMICAL FLUSH PROCEDURE
WARNING:WEAR RUBBER GLOVES DURING THIS STEP. CHEMICAL CLEANER MAY CAUSE SKIN IRRITATION.
- Partially raise vehicle.
- Install radiator draincock.
- Lower vehicle.
- DO NOT add chemical cleaner to the coolant recovery bottle. Using a funnel, slowly add one (1) bottle of chemical cleaner (F8AZ-19A503-AA) into the HEATER RETURN HOSE (Figure 8).
-
NOTE:THE RECOMMENDED CHEMICAL CLEANER MUST BE USED.
- Connect and clamp the heater return hose to the water pump fitting.
- Slowly fill cooling system with water. Squeeze upper radiator hose to purge air from system as water is added. Coolant level must be filled to the top of the clear portion of the coolant recovery bottle to completely clean the coolant bottle.
- Start engine and raise RPM to 2000 RPM for 2 minutes. Do not exceed 2500 RPM.
- Check cooling system for leaks.
- Recheck coolant level. Add water, if necessary to bring level up to the top of the clear portion of the bottle.
- Install coolant bottle pressure relief cap.
- Run engine at idle until upper radiator hose is hot (when thermostat opens) approximately 12 minutes.
- Turn engine off and let chemical solution soak for a minimum of thirty (30) minutes, while engine cools.
WARNING:COOLANT MAY BE HOT. REMOVE COOLANT PRESSURE RELIEF CAP.
- Partially raise vehicle.
-
WARNING:WARNING WEAR RUBBER GLOVES FOR THIS STEP. CHEMICAL CLEANER MAY CAUSE SKIN IRRITATION.
- Remove radiator draincock.
- Completely drain chemical solution and discard.
- Lower vehicle.
- Disconnect heater return hose from water pump fitting (Figure 9).
- Install a 3/4" I.D. rubber cap on the water pump heater hose fitting (Figure 9).
- Disconnect and plug radiator overflow hose from coolant recovery bottle. Discard clamp (Figure 10).
- Attach a 4 foot section of 3/8" vinyl hose to overflow fitting on the coolant recovery bottle. Let vinyl hose hang over fender (Figure 10).
- Install coolant pressure relief cap.
- Connect garden hose (water supply) to heater return hose using 3/4" adaptor.
- Turn garden hose on full pressure.
- With engine off, flush engine for at least five minutes and until water is clear. Water will drain out of radiator draincock and the 4 foot vinyl hose.
- Turn garden hose off and remove pressure relief cap from bottle.
- Disconnect garden hose from heater hose. Let cooling system completely drain before proceeding.
- Raise vehicle.
- Install and tighten draincock.
- Install splash shield.
- Lower vehicle.
- Remove rubber cap from the water pump.
- Install new screw clamp on heater return hose and reconnect to water pump. Tighten clamp.
- Reattach and secure alternator brace.
- Remove 3/8" vinyl hose.
- Unplug radiator overflow hose and install new screw clamp. Reconnect radiator overflow hose to coolant recovery bottle and tighten clamp.
- Add one (1) bottle (16 oz) of heavy duty cooling system additive (FW-16) to coolant recovery bottle.
- Add six (6) quarts of new coolant to coolant recovery bottle. Fill remainder of cooling system with water to top of clear lower portion of coolant recovery bottle.
- Start engine and top off with water to top of clear lower portion of coolant recovery bottle (Figure 11).
NOTE:THE NEXT STEP MUST BE DONE BEFORE THERMOSTAT OPENS.
- Raise engine RPM to 3000 RPM for 30 seconds and check for foaming inside the coolant recovery bottle. If foaming is present the coolant by-pass restrictor has not been installed. Turn off engine and install the coolant by-pass restrictor (F7PE-8N030-AA) contained in 1996-1997 bypass kit (F7DZ-8522-AB). Refer to coolant by-pass restrictor installation procedure in the bypass kit instructions.
- Install coolant pressure relief cap.
- Select maximum heater temperature and blower motor speed settings. Position control to discharge air from the instrument panel vents.
- When vehicle reaches normal operating temperature, verify hot air from panel vents and a hot upper radiator hose.
- CAUTION: If air discharge remains cool and engine coolant temperature gauge does not move, engine coolant level is low and must be filled. Stop engine, allow to cool and fill cooling system to top of clear lower portion of coolant recovery bottle.
- Start engine and allow it to idle until normal operating temperature is reached. Hot air should discharge from panel vents. The engine coolant temperature gauge should maintain a stabilized reading within the NORMAL range and upper radiator hose should feel hot to touch.
- Shut engine off and allow engine to COMPLETELY COOL.
- Check engine for coolant leaks.
- IF NECESSARY, ADD COOLANT UNTIL LEVEL IS AT THE TOP OF THE CLEAR PORTION OF THE COOLANT BOTTLE (FIGURE 11).
- INFORM CUSTOMER THE IMPORTANCE OF MAINTAINING COOLANT LEVEL. IT'S RECOMMENDED THAT COOLANT CAN BE SAFELY FILLED TO THE TOP OF THE CLEAR PORTION OF THE COOLANT BOTTLE WHEN THE ENGINE IS COLD. THIS PROVIDES EXTRA RESERVE COOLANT.
PART NUMBER PART NAME
F8AZ-19A503-AA Chemical Cleaner
FW-16 Coolant Conditioner
VC-4A Engine Coolant
F7DZ-8522-AB Coolant By-Pass Kit - 96-97 Taurus/Sable
F8DZ-8522-BA Coolant By-Pass Kit - 98 Taurus/Sable
F8DZ-8522-CC Coolant By-Pass Kit - 96-97 Methonal Taurus/Sable
1F1Z-8501-AA Water Pump - 96-98 Taurus/Sable
F8DZ-6C057-AA Core Plug
|
|
| |
|
|
Hammer Time
Ultimate Carjunky
/ Moderator
Dec 5, 2015, 8:32 PM
Post #18 of 22
(2275 views)
|
|
Re: 98 mercury sable U engine. Spraying coolant out of engine on driver side.
|
Sign In
|
|
The cost of the plugs isn't your concern. Some of these freeze plugs require removing the engine or transmission to access. You might want to consider getting rid of this vehicle. You probably have a blown head gasket already from the original overheat.
This solution isn't as simple as buying a few brass plugs.
~~~~~~~~~~~~~~~~~~~~~~~~~~~~~~~~~~~~~~~~~~~~~~~~~~~~~~~~~~~~~~~~~~~~
We offer help in answering questions, clarifying things or giving advice but we are not a substitute for an on-site inspection by a professional.
|
|
| |
|
|
Tom Greenleaf
Ultimate Carjunky
/ Moderator
Dec 5, 2015, 11:30 PM
Post #19 of 22
(2267 views)
|
|
Re: 98 mercury sable U engine. Spraying coolant out of engine on driver side.
|
Sign In
|
|
OP - HT spot on. If this is truly for any reason a real rotted freeze plug and ALL are not done it's no longer dependable for another to do the same. Fine for some as a second or third car not as primary.
No question it's a reason to think hard about another car if you count on it that much and are not going to go for it with whatever it needs IMO highly likely the heads gasket job already.
Decision time to go for it all or get out for another if you must have dependable transportation with this type of issue,
T
|
|
| |
|
|
Wesdod151
Novice
Dec 6, 2015, 8:04 PM
Post #20 of 22
(2244 views)
|
|
Re: 98 mercury sable U engine. Spraying coolant out of engine on driver side.
|
Sign In
|
|
I actually have a second car thankfully. I ordered an entire set of freeze plugs im changing every gasket it has. Fortunately i have a buddy who will help me do it and raise transmission so we can get those plugs
|
|
| |
|
|
Tom Greenleaf
Ultimate Carjunky
/ Moderator
Dec 6, 2015, 9:48 PM
Post #21 of 22
(2239 views)
|
|
Re: 98 mercury sable U engine. Spraying coolant out of engine on driver side.
|
Sign In
|
|
Check for tools that may help both getting old ones out and new ones in. Have to admit I personally didn't do full battle and all on any as the vehicle overall wasn't likely to last too much longer frequently rust in general not usually a problem on these more trouble from inside said above from low or no antifreeze.
? Seemed like it would just pick on a car and not always an explanation why when another had no issues.
BTW - When I looked up the "Dorman" copper types it was a company for assorted stuff that I don't think exists under that name anymore but the idea of those remains by others.
Good luck. Some are a real pest even when you have a real good shot at them,
T
|
|
| |
|
|
Hammer Time
Ultimate Carjunky
/ Moderator
Dec 7, 2015, 3:14 AM
Post #22 of 22
(2234 views)
|
|
Re: 98 mercury sable U engine. Spraying coolant out of engine on driver side.
|
Sign In
|
|
I still don't think you are understanding what it takes to change all freeze plugs. Both the engine and transmission would likely have to be removed from the car separately to be able to access all plugs.
~~~~~~~~~~~~~~~~~~~~~~~~~~~~~~~~~~~~~~~~~~~~~~~~~~~~~~~~~~~~~~~~~~~~
We offer help in answering questions, clarifying things or giving advice but we are not a substitute for an on-site inspection by a professional.
(This post was edited by Hammer Time on Dec 7, 2015, 3:16 AM)
|
|
| |
|
