|

|

mg02914
Novice
Jan 25, 2009, 4:29 AM
Post #1 of 8
(2475 views)
|
i have a 91 bonnevill 3.8 motor that runs and starts fine all year till it sits over night in frezzing temps then it turns over fine but wont start ,think it might be flooding
|
|
|  |

|

Tom Greenleaf
Ultimate Carjunky
/ Moderator

Jan 25, 2009, 7:11 AM
Post #2 of 8
(2472 views)
|
Hmmm? To help - what temps are you talking about? Will it eventually start or do you do something to force it to start?
If and when it does start - is that then fine for the day? When you said you thought it was flooding, please describe how you are guessing that. If you see black smoke out exhaust for a while that's a good clue or soaked plugs if not able to start it.
If it's truly flooding - for now try putting foot to floor which should cancel the delivery of fuel for that time and release when it starts - don't let it over rev over that,
T

|
|
|  |

|

bruceg
User
Jan 25, 2009, 8:29 AM
Post #3 of 8
(2468 views)
|
hey tom, sounds like you know what your talking about, can you take a look at my post and tell me what you think, i have the suburban, checked the flexplate already for cracks or breaks, not it, has to be in the motor, have all the pan bolts out, i am guessing i have to jack the motor up to get the pan off. thanks
|
|
|  |

|

Tom Greenleaf
Ultimate Carjunky
/ Moderator

Jan 25, 2009, 8:38 AM
Post #4 of 8
(2465 views)
|
Keep the threads separate on different vehicles or it will just confuse everything.
On the Bonneville - if it starts and really is an over fueling issue I need the answer to that and then I/we can make suggestions for testing and possible fixes. Tell us more about that problem keeping the two issues separate,
T

|
|
|  |

|

mg02914
Novice
Jan 25, 2009, 10:56 AM
Post #5 of 8
(2453 views)
|
i put jumpers on it tune the hell out of it finnilly it usually starts alltho now i blew the sillinoid on the starter
|
|
|  |

|

mg02914
Novice
Jan 25, 2009, 11:06 AM
Post #6 of 8
(2446 views)
|
tom when it starts its fine all day till it sits over night in frezzing temps. when it does not start i pull a plug and its soaked with gas. a couple people have told me that the coil pack on these 3.8 motors some times dont work when temp drops below freezing have herd anything about this?
|
|
|  |

|

Tom Greenleaf
Ultimate Carjunky
/ Moderator

Jan 25, 2009, 1:12 PM
Post #7 of 8
(2436 views)
|
"Quote" It finally starts usually"
That suggests it gets spark but check anyway. Don't crank the brains out of it again - it's either going to go or not so save the starter.
It does seem like it's overfueling and I've not seen the fault quite to this extreme but there's a sensor to tell the injectors how much fuel to add for the given temp. Apparently it can behave when warmed so I'm not sure what testing is going to prove or quite how this thing that changes resistance based on temp could fail that way but I suppose anything is possible.
You can test it as described below or toss it. Think about replacing the plug to it as well or a careful inspection. May be called ECT or CTS 'sensor' depending on parts outlet. Make sure it's NOT the one the triggers fans for radiator - that would use the name "switch" on the description.
HERE YOU GO!
***************
OPERATION
See Figure 1
Most engine functions are affected by the coolant temperature. Determining whether the engine is hot or cold is largely dependent on the temperature of the coolant. An accurate temperature signal to the PCM is supplied by the coolant temperature sensor or Engine Coolant Temperature (ECT) sensor. The coolant temperature sensor is a thermistor mounted in the engine coolant stream. A thermistor is an electrical device that varies its resistance in relation to changes in temperature. Low coolant temperature produces a high resistance, and high coolant temperature produces low resistance. The PCM supplies a signal of 5 volts to the coolant temperature sensor through a resistor in the PCM and measures the voltage. The voltage will be high when the engine is cold and low when the engine is hot. 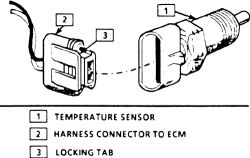 Fig. 1: Engine Coolant Temperature (ECT) sensor and connector Fig. 1: Engine Coolant Temperature (ECT) sensor and connector
TESTING
Sensor in Vehicle
See Figures 2, 3, 4, 5 and 6 - Unfasten the retaining bolts, then remove the bracket.
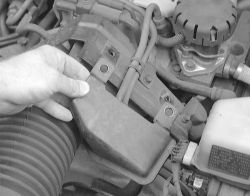 Fig. 2: Unfasten the retainers, then remove the throttle bracket for more access to the sensor Fig. 2: Unfasten the retainers, then remove the throttle bracket for more access to the sensor - Use a long screwdriver or prytool to lift the ECT sensor locking tab and detach the connector.
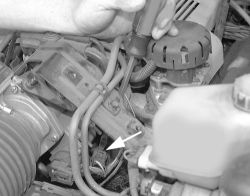 Fig. 3: Use a long screwdriver to carefully lift the sensor locking tab, then unplug the connector Fig. 3: Use a long screwdriver to carefully lift the sensor locking tab, then unplug the connector - Attach an ohmmeter to the sensor terminals, then measure the resistance and compare with the accompanying chart.
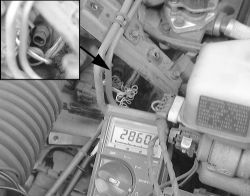 Fig. 4: Use needlenose pliers to attach an ohmmeter to the sensor terminals, then measure resistance (tested at 80°F) Fig. 4: Use needlenose pliers to attach an ohmmeter to the sensor terminals, then measure resistance (tested at 80°F) 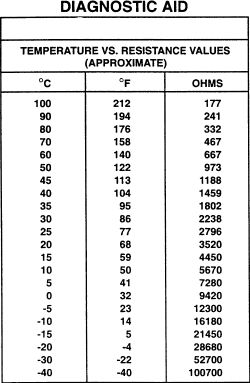 Fig. 5: Engine Coolant Temperature (ECT) and Intake Air Temperature (IAT) sensor temperature vs. resistance values Fig. 5: Engine Coolant Temperature (ECT) and Intake Air Temperature (IAT) sensor temperature vs. resistance values 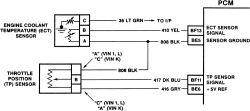 Fig. 6: Engine Coolant Temperature (ECT) and Throttle Position (TP) sensor circuits Fig. 6: Engine Coolant Temperature (ECT) and Throttle Position (TP) sensor circuits
Sensor Removed From Vehicle
See Figure 7 - Remove the ECT sensor from the vehicle.
- Immerse the tip of the sensor in a container of water.
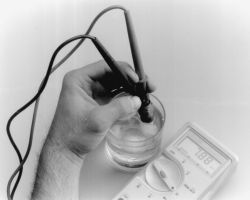 Fig. 7: Submerge the end of the temperature sensor in cold or hot water and check resistance Fig. 7: Submerge the end of the temperature sensor in cold or hot water and check resistance - Connect a digital ohmmeter to the two terminal of the sensor.
- Using a calibrated thermometer, compare the resistance of the sensor to the temperature of the water. Refer to the accompanying resistance value chart.
- Repeat the test at two other temperature points, heating or cooling the water as necessary.
- If the sensor does not meet specifications, it must be replaced.
REMOVAL & INSTALLATION
See Figures 8, 9, 10 and 11 - Disconnect the negative battery cable.
- Drain the radiator into a suitable container, to a level below the sensor.
- For 1987-91 vehicles, perform the following:
- Properly relieve the fuel system pressure, as outlined in .
- Unfasten the 10mm bolt and bracket holding the fuel line to the throttle cable bracket.
- Loosen the fuel supply and return lines from the fuel rail and carefully move aside.
- Fabricate a loop of wire or use a long prytool to slip under the locking tab of the electrical connector and gently pull on the tab to disengage it.
- For 1992-99 vehicles, perform the following:
- Remove the air induction tube or rear air intake duct, as applicable.
- Detach the sensor electrical connector.
- Using a 19mm deep well socket and extension, remove the sensor.
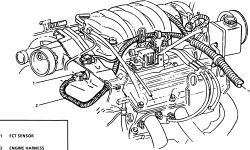 Fig. 8: Location of the ECT sensor - 3.8L (VIN L) engine shown Fig. 8: Location of the ECT sensor - 3.8L (VIN L) engine shown 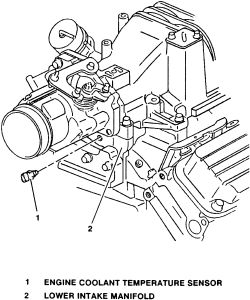 Fig. 9: Exploded view of the ECT sensor mounting - 3.8L (VIN 1) engine Fig. 9: Exploded view of the ECT sensor mounting - 3.8L (VIN 1) engine 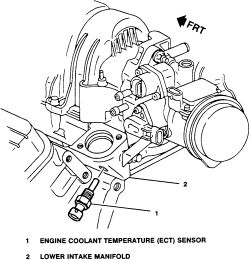 Fig. 10: ECT sensor location - 3.8L (VIN 1) engine Fig. 10: ECT sensor location - 3.8L (VIN 1) engine 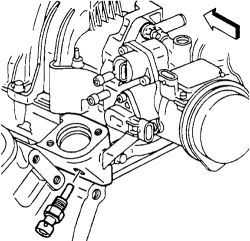 Fig. 11: Insert the ECT sensor into its mounting hole - 1996-99 vehicles Fig. 11: Insert the ECT sensor into its mounting hole - 1996-99 vehicles
To install:
- Coat the ECT sensor threads with a suitable sealant.
- Install the sensor and tighten to 22 ft. lbs. (30 Nm).
- For 1992-99 vehicles perform the following:
- Attach the sensor electrical connector.
- For VIN 1 and L engines, install the air induction tube.
- For 1987-91 vehicles, perform the following:
- Attach the electrical connector.
- Connect the fuel supply and return lines.
- Install the fuel line bracket.
- Connect the negative battery cable, then refill the cooling system.

|
|
|  |

|

mg02914
Novice
Jan 28, 2009, 6:48 PM
Post #8 of 8
(2399 views)
|
hey tom i cant thank u enough for helping me out thier are not enough good people like yourself in the world. i have not tried what u suggested yet cause i went to go push the car in the garage sunday morning to install new starter and tore my calf musle pushing the car in. todays is wednesday and i just got the stater in this afternoon the frikin car starter right up. i left it at that for today but tomorrow im going to install new wires cause the old ones look old and Sh!ty. and then im going run those tests u seggested sounds good candidate that peski sencor. i will let u know how i make out thank so mutch
|
|
|  |
|


