
Tom Greenleaf
Ultimate Carjunky
/ Moderator

Apr 4, 2009, 4:17 AM
Post #1 of 3
(118991 views)
|
 REFRIGERANT CHARGING PROCEDURE IN AUTOMOTIVE A/C SYSTEMS
|
|
|
(Notes for up front:This is as concise as this ever so important procedure can be. Credit to my friend "Nacho" of Hermosillo, Sonora, MEXICO)
{#1 IS MOST IMPORTANT: YOU MUST KNOW YOUR EQUIPMENT, WHERE IT'S HOLDING REFRIGERANT AND WHERE IT'S REAL MAXIMUM VACUUM. CHANGES TO ASSORTED ITEMS YOU MAY USE WILL PREVENT YOU FROM VACUUMING OUT LINES TO EQUIPMENT HOSES. YES, THAT TINY AMOUNT OF AIR IN HOSES NOW MATTERS MORE THAN EVER AS SYSTEM CAPACITIES ARE LOWER AND LOWER BY WEIGHT THE % OF AIR WITH MOISTURE IN IT IS TOTALLY CONTRARY TO LASTING PROPER PERFORMANCE OF A SYSTEM. DO NOT USE PRODUCTS THAT ARE NOT SPECIFICLLY SUGGESTED FOR USE THAT CONTAIN ADDITIVES, SEALERS OR ANY MYSTERY MAGIC CLAIMS IS A CLUE IT'S NOT WHAT YOU SHOULD BE USING. THIS IS HARD TO READ AND QUITE LONG. TAKE YOUR TIME. MISTAKES WHEN READY TO CHARGE CAN SET YOUR JOB BACK WORSE OFF THAN BEFORE YOU STARTED VERY EASILY SO BE WARNED}
Tom Greenleaf
(edit in) Think real hard about new/newer vehicles that are using IMO a failed refrigerant called R-1234yf. It's not compatible with anything all new equipment and procedures and TMK is totally flammable? Read an ad or look up costs of a 10lb bottle of this crap.
"> R-1234YF Refrigerant Honeywell - Sealed, 10 Lb Can Solstice R1234yf, one sale for a mere $799US at this edit AYOR totally for even acquiring a vehicle use this! <" Date today is 11-24-2018
~~~~~~~~~~~~~~~~~~~~
Links - if they are down here. If more help needed visit us at....
>VERY HANDY WEIGHT CONVERTER > https://forum.aircondition.com/weight <
Basic Charging Procedures: REFRIGERANT CHARGING PROCEDURE IN AUTOMOTIVE A/C SYSTEMS We recommend reading this procedure completely before charging. You may need information before charging you want to keep handy. Have this procedure with you while charging. Although it can be done by a single person, we recommend having a helper around. This procedure outlines the steps to perform a complete charge. These steps are not to be used to refill or make partial charges. Toping off requires system parameters monitoring and knowledge, specially in R134a-based system. Excessive gas will harm your system and will keep it from cooling properly. MORE REFRIGERANT DOES NOT MEAN COLDER TEMPERATURES CHARGING IN GAS OR LIQUID - Please read step 10 Do not use the sightglass (if so equipped) in R134a-based systems as if were R-12 based. SPECIAL EQUIPMENT REQUIRED 1) Vacuum pump 2) Gauges (R12 or R134a) 3) Service port adapter (as required in most R12-based systems) R134a systems do not require adapters other than the couplers in your gauges in the majority of applications 4) Refrigerant gas (R12 or R134a) 5) Optional: 2-3 ounces of specified oil. **************
1. Make sure what is the required amount of gas. From factory, all systems have a decal under the hood that give the data. If the decal is missing or you are not sure, please specify make, model, and the type of refrigerant used and whether your system is a factory or an after market unit. It is very important to know if your system has oil. Oil starvation is the main reason of compressor failure. Oil can be added to the system in two ways: with oil injectors or through the low side port under vacuum. The procedure to add oil through vacuum is described. Some refrigerant charge and other useful specifications are provided
2. Connect both blue and red gauge hoses to the system's service ports. The discharge port (red hose) is located somewhere between the compressor and expansion device, either before the condenser or after it. In R134a systems, the port is the thicker of both, while in R12 systems is the thinner one. In some aftermarket systems, the port is located in the back of the compressor. If your ports are located in the compressor, the low side is marked by an "S" and the high side by an "H". Port caps have an "L" for low or "H" for high.
3. Open both gauge valves. Connect the common hose (yellow one) to the vacuum pump. Make sure both gauge needles are zeroed down. Needle is adjusted by turning a fine screw inside the dial. You must remove the plastic lens to do this.
4. Turn the pump on. You'll notice that both gauge readings begin to drop. The blue gauge's needle will even dip into negative values. The desired low side reading should be less than -25, while the high side will remain at 0.
5. After approximately 5 minutes, close both gauge valves. Turn the pump off, and observe the needles. Any movement will indicate vacuum loss. The faster the movement, the greater the loss. If after two minutes you don't see any needle movement, open both valves, turn the pump on, and continue vacuum for not less than 30 minutes. Close both valves then turn the pump off.
6. Get ready to charge. Have the necessary refrigerant amount handy. Cans make charging easier and more precise unless you have a charging cylinder or a precision scale.
7. Disconnect the yellow hose from the vacuum pump and connect it to the can tap or charging cylinder valve. You can charge in two ways: liquid (can upside down) or gas. Liquid charging is a lot faster but not recommended unless you extreme care or have experience. Traditional (gas) charging is slower but safer.
8. Once you've decided, and with the can or container connected, unscrew the top yellow hose connection (at the gauges) allowing refrigerant to escape for a couple of seconds. This will purge the air out of the hoses so you make sure that all you dispense is refrigerant. You can do this venting in liquid form so you can see when a fine, steady stream of refrigerant escapes indicating that all the air is gone from the hose. Don't breathe refrigerant and don't charge in a flammable environment.
9. "Flood" the system with liquid refrigerant (can upside down) by opening the red valve (high side) until it won't take anymore. Close the red valve. Jump the low pressure cycling switch (if so equipped). If you don't know what this is or where it is, ask for help.
10. Turn the engine on. Turn the A/C into MAX on its third or higher blower speed. You'll note that both gauge readings are now positive. The red gauge should read between 100 and 150, while the blue gauge between 5 and 15. If you are charging with cans, don't forget to purge air out the hose after hooking a new can as described in step 8 above. Now, charge will continue through the low (blue) side (see note below) . If you haven't jumpered any switch (you don't have to), you'll notice the compressor cycling frequently on and off. That is normal. The cycling will disappear as you dispense more refrigerant. The only disadvantage of frequent compressor cycling is that charge will take longer. Needles will move up and down with every cycle. This is normal. Do not jump any switch unless you are absolutely certain!. WARNING: DANGER
NEVER OPEN THE RED VALVE WHILE CHARGING. The red valve is to be opened only during pre-charge, vacuum, or when a system is evacuated. Its function is keeping an eye on the high side only. It must be closed at all times. If you have any doubts, wait until you receive information. Severe injury or death may occur. Remember: ALWAYS wear safety goggles. NEVER charge your system in a closed environment. GAS OR LIQUID CHARGING?
There are two ways to charge: gas (can or cylinder up), or liquid (can or cylinder upside down). A compressor is designed to compress gas. Direct liquid charge will harm the compressor if suction pressure is not controlled. Liquid charging is faster, yet is riskier. Liquid charging should be made by professionals or under supervision. Liquid charging can be done if the suction port is away from the compressor (some compressors have the suction valve in its body).
Liquid charging can be done never exceeding a 50 PSI suction pressure. If you can't control it, charge in gas form. In cooler weather, cans may freeze. You may immerse them in water and shake them while charging.
11. Once about 2/3 of the charge has been dispensed into the system, spray water in the condenser to optimize heat exchange and speed the process. When you get the condenser wet, vent temperature is likely to raise. This is normal. You'll also note pressure drop in both gauges.
12. Once the specified amount has been dispensed, close the blue valve. Let the system run for a minute. Turn the A/C off and then the engine. Wait another minute and disconnect the couplers from the service ports. Disconnect the low side first. If you jumpered a switch, reconnect it too.
Optimum cooling performance is attained after 10 minutes of operation. Our own acceptance criteria is at least 50°F in the center vent to the driver side at idle after 10 minutes or less. Remember: cooling increases while the vehicle is in motion. VERY IMPORTANT
Due to the physical properties and chemical composition, R134a and R12 charging amounts are different. Never, if you are retrofitting, charge the same or specified amount of R12 with R134a. If in doubt, please e-mail us. Do not use this procedure if you are using any other refrigerant. This is just for R12 or R134a. Although procedures and parameters may be similar, we do not use nor recommend alternative refrigerants. HOW TO DETERMINE OPERATING PRESSURES
Every vehicle has its own operation parameters specification. Depending on whether or not the vehicle has a factory or an after market system, and whether it was retrofitted or is still original, among others. There is no established calculation to determine the exact operating pressures.
The low pressure (blue gauge) should be 35 or less at idle, regardless of the type of gas. Only if you're running a dual system, the low pressure may be between 45 and 50 at idle.
The high pressure, for starters, is directly related to ambient temperature: the higher the temperature, the higher the higher the pressure.
Bear in mind that dispensing a complete charge without lowering the pressures with water will result in higher readings. This is normal, and that is why you should spray water in the condenser at 2/3rds of the charge or once you have completed it. You'll note an immediate pressure drop when you spray water in the condenser.
To obtain a ballpark high side value, multiply ambient temperature by 2.2 if you have an R12 system. If you have a factory R134a system, use 2.3. To convert °C to °F, use this formula: °C X 1.8 + 32.
Remember: this is only a ballpark. If in doubt, we have factory charts to help you determine the correct pressures. Please have your vehicle's make, model, refrigerant type, and year and.
Factors like a an obstructed or very dirty radiator and condenser, weak or inoperative fan clutch, weak or inoperative radiator fan(s), either electric or mechanical, will make pressures go up and impair cooling, even in mild days.
Great thanks to my good friend Nacho,
T
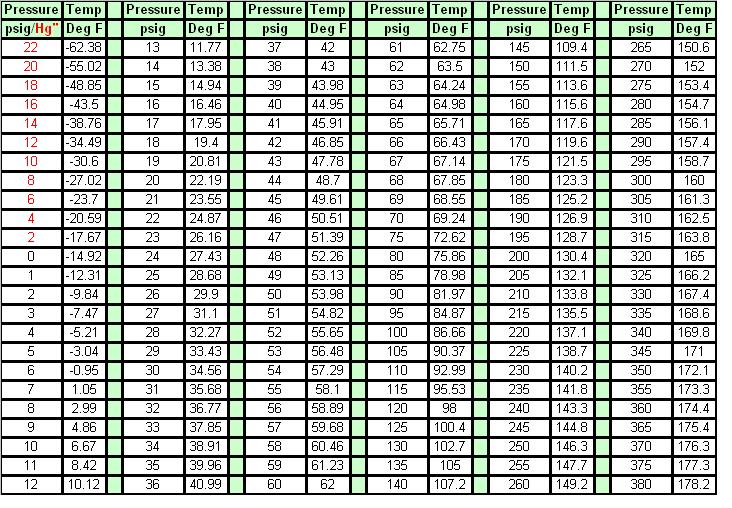
(Added a handy chart below)
R-134a Pressure vs Temp Chart
 by ACProf on Tue Oct 06, 2009 11:25 pm R-134a, like all refrigerants, has a unique temperature to pressure relationship. If you know one, you can look up the other on the following chart. by ACProf on Tue Oct 06, 2009 11:25 pm R-134a, like all refrigerants, has a unique temperature to pressure relationship. If you know one, you can look up the other on the following chart.
This should be here too to show how important vacuum is to removing moisture "THE ENEMY" in a system BEFORE charging one up!


(This post was edited by Tom Greenleaf on Jul 25, 2022, 12:15 PM)
|
