|

|
Venture head gasket replacement; questions
|
|
|
| |
|
|
Lemonpie
User
Feb 8, 2013, 9:50 PM
Post #1 of 16
(2241 views)
|
|
Venture head gasket replacement; questions
|
Sign In
|
|
Hello, I am new to the forum and have read some good threads on the GM 3.4 liter intake gaskets and head gaskets. In particular the ones started by MarineGrunt in 2012. Like he, I also have a 2002 Chevy Venture with 141k miles. It was losing coolant, I used coolant dye, with UV light and could never find a coolant leak. I resolved then to replace the intake gaskets and before starting I used a Balkamp chemical detector with the blue dye over the radiator filler neck while idling. That indicated a head gasket failure as the blue liquid turned green/yellow in a few minutes.
I have the upper and lower intake manifolds off. I am cautious/slow, as I have only done head work on RWD cars in high school shop class in 1974. That was easy, this is harder!
Question #1. Regarding the passenger side torque strut. All that I can see indicates that I must remove the bolts that hold on the AC compressor to remove this strut. (Strut is a black painted, curved iron casting that goes from the compressor at its low side to the top of the front head at its high side). At its high side, it kind of "dowel-pins" into the top of the head, between 2 head bolts. Am I missing something? I really hate to drop the AC compressor if that isn't needed. (Why did GM do this?)
Question #2. The Haynes manual says I should pull the EGR connection and the oxy sensor from the rear exh manifold, prior to pulling he head. I hesitate to do both. (The Haynes manual also told me to pull the coil pack way too soon. You pull the coil pack AFTER pulling the rear valve cover as I see it).
Question #3. Should I try to pull the back head with the exhaust manifold attached or remove it with the manifold in place?
Last questions..Do you recommend leaving the Oxygen sensor original or replacing it simply due to its age,.....and should I grind the valves? (I will replace stem seals and check head for flatness).
I am in nearly over my head, at least I am in a semi heated garage with good lighting. The intake gaskets have looked pretty good actually.
Many many thanks in advance.
Lemonpie
|
|
| |
|
|
MarineGrunt
Enthusiast

Feb 9, 2013, 12:21 AM
Post #2 of 16
(2215 views)
|
|
Re: Venture head gasket replacement; questions
|
Sign In
|
|
Question #1
I can't remember for the life of me if it is absolutely necessary to remove the compressor. It seems like I had the same problem you're having so I went ahead and unhooked it only to find out there was a hidden bolt around the middle. Seems like there was a 3rd bolt. It was kind of back in a "hole". It's easy removing the bolts from the compressor. A 15mm gear wrench comes in handy for one of the bolts. You don't have to disconnect the lines. Just loosen the bolts and leave them in place. The bolts, along with the compressor, will lay forward and lean against the sub frame. Only takes a couple minutes. I just can't remember if the strut bracket wraps along the side of the compressor or if one of the bolts from the compressor goes through a bottom hole in the bracket. It might even just kind of sandwich it together. I wanna say it curves along the side and you don't have to remove the compressor but I can't say for sure. I just remember I had the same issue. I'll try and take a look in the morning to see if it jars my memory. I do remember really having to wiggle that bracket to get it off. It was kind of seized on there a bit. Check in one of the "coves" for another bolt. I either took a mirror to it or I went by feel but I know it's there. Maybe try that before removing the compressor bolts.
Question #2
I didn't remove the oxygen sensor but I did pull the egr connection. You're talking about the metal "flex" pipe deal, correct? I think it's just a 3/4" wrench. Mine seemed to come off pretty easy. I think I took it off just to make more room. You could probably leave it attached and just wire it out of the way.
Question #3
For the back head I just removed the 6 nuts from the manifold studs. I didn't split the exhaust at all. I also didn't remove the crossover pipe like it said to do. The bottom middle nut was a pain. You can't get much of a turn on it. If I remember right I went and bought a 13mm gear wrench for reassembly because a 13 didn't come in my set. You can do it without but it takes some time. Once the 6 nuts were removed I had to pry the manifold back with a bar to get it off and on but the exhaust does move enough. If you have already split the exhaust pipe from the manifold you might as well just pull the rear head with the manifold still attached. The crossover pipe will come up with it unless you have it disconnected too. If you haven't disconnected any exhaust I'd just leave it all in place and disconnect the manifold from the head.
I'd highly recommend taking the heads to a machine shop to have the pressure tested and planed. I think it cost me about $150 or so for both heads to be tested and planed. How mad would you be if you got it all back together only to find out you had a hairline crack or a warped head! If it has never been done now might also be a good time to install a new timing chain and crankshaft seal. It will make it much easier since you already have the ps pump and alternator off. You know how tight it is working on the van so do it now while you have the room.
I'll be around all weekend so will try and check back in case you have any other questions. I'll get back to you about the compressor and bracket too. I sure wish I could remember! I know I wasn't that great of help but hopefully I answered a few of your questions.
You know. This is what I'm thinking happened with the bracket. The other strut had 3 bolts, right? I think I could only find 2 on the other so assumed that a bolt from the ac compressor ran through it. I think I removed the ac compressor and it still wouldn't come off. That's when I found the 3rd bolt. But, since I already had the compressor removed I can't be 100% sure that it has to come off. If you haven't removed the same amount of bolts that you did from the other side get a mirror or keep feeling for the hidden bolt.
|
|
| |
|
|
Lemonpie
User
Feb 9, 2013, 12:56 AM
Post #3 of 16
(2211 views)
|
|
Re: Venture head gasket replacement; questions
|
Sign In
|
|
Thank you, MarineGrunt, it should help me over the weekend.
Lemonpie
|
|
| |
|
|
Hammer Time
Ultimate Carjunky
/ Moderator

Feb 9, 2013, 4:05 AM
Post #4 of 16
(2206 views)
|
|
Re: Venture head gasket replacement; questions
|
Sign In
|
|
If i remember right, that A/C bracket wraps around one of the head bolts or the head itself and has to be removed.
~~~~~~~~~~~~~~~~~~~~~~~~~~~~~~~~~~~~~~~~~~~~~~~~~~~~~~~~~~~~~~~~~~~~
We offer help in answering questions, clarifying things or giving advice but we are not a substitute for an on-site inspection by a professional.
|
|
| |
|
|
MarineGrunt
Enthusiast
Feb 9, 2013, 9:42 AM
Post #5 of 16
(2183 views)
|
|
Re: Venture head gasket replacement; questions
|
Sign In
|
|
I don't know how you can remember everything about every car HT! That strut bracket does wrap over the head.
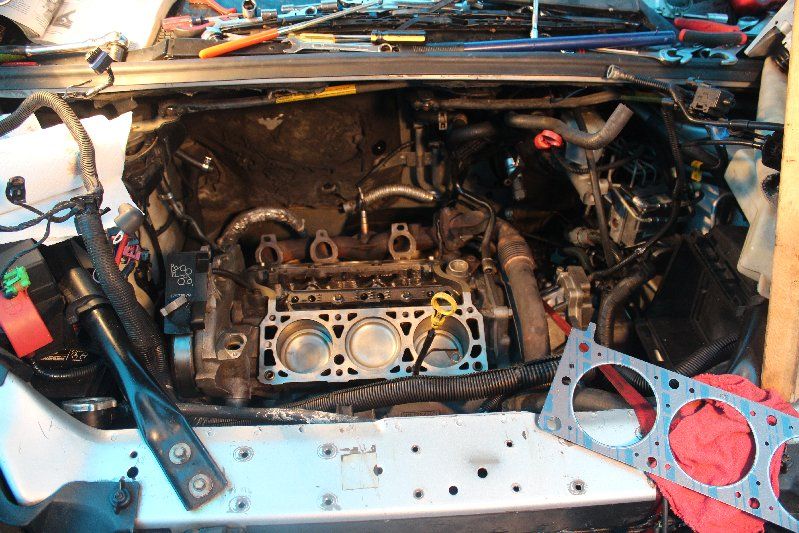
Here's a picture that shows how I left the exhaust in place. I know the Haynes manual says to do it a little different and alldatadiy says to remove the crossover pipe but I left that in place too. I think it might've been easier to split the exhaust pipe where it connects to the manifold and pull the rear (or left) head with the manifold still attached. My problem was the 3 bolts on the exhaust pipe weren't moving and I don't have a torch so couldn't cut them. It still wasn't too bad removing the manifold from the head. It was just that one nut that was a pain. I had a couple manifold studs break on me so if you're out and about you might wanna pick up a couple to have on hand.
I'll run out now and take a look at the bracket. Not sure if I'll be able to tell if the compressor goes over it or not. Wish my memory was as good as HT's!
I'm sure you plan on it but I'd replace the plugs and wires while you're at it. Now's the time to do them cause the rear are a pain otherwise.
Another thing that helps when install the lower intake is by getting 4 long pieces of all thread that fit in the bolt holes. You put them in the intake bolt holes so the intake slides right down in place. It will keep it from sliding around and messing up the rtv. I couldn't find the right size locally so bought some round stock and made my own all thread. I wanna say it was 12mm x 1.75? You might wanna measure a bolt first to be sure. When I did the intake gasket last year I think I used wooden dowels instead. You'll also need a 10mm crows foot in order to torque the side bolts on the intake. Make sure you tighten them down in the correct sequence. They came out with a new sequence and not sure if the Haynes manual has the tightening sequence. I can post it if you need it. Also make sure you get new head bolts. They have to be replaced because they're torque-to-yield bolts.
I have other pictures if you need to see anything how anything goes back together.
(This post was edited by MarineGrunt on Feb 9, 2013, 10:14 AM)
|
|
| |
|
|
MarineGrunt
Enthusiast
Feb 9, 2013, 10:16 AM
Post #6 of 16
(2175 views)
|
|
Re: Venture head gasket replacement; questions
|
Sign In
|
|
The compressor has to be removed or at least the bolts have to be loosened. If you're facing the van the top right bolt on the compressor runs through a hole in the bottom of the bracket. Leave the lines attached. Loosen the bolts and just let the bolts and compressor lean against the sub frame. You only need the compressor to slide forward about an inch.
|
|
| |
|
|
Hammer Time
Ultimate Carjunky
/ Moderator
Feb 9, 2013, 11:17 AM
Post #7 of 16
(2171 views)
|
|
Re: Venture head gasket replacement; questions
|
Sign In
|
|
I'm pretty sure that compressor has to come all the way out as there are more bolts under it to get the bracket loose.
~~~~~~~~~~~~~~~~~~~~~~~~~~~~~~~~~~~~~~~~~~~~~~~~~~~~~~~~~~~~~~~~~~~~
We offer help in answering questions, clarifying things or giving advice but we are not a substitute for an on-site inspection by a professional.
|
|
| |
|
|
Lemonpie
User
Feb 9, 2013, 11:34 AM
Post #8 of 16
(2162 views)
|
|
Re: Venture head gasket replacement; questions
|
Sign In
|
|
Thank you guys, very helpful. Especially the photo. I am trying to leave the rear exh manifold in place. The manifold heat shield screw seems stubborn, I'm determined not to break it but the shield might prevent penetrating fluid from working in to the threads. I will certainly replace plugs again (had new plugs and wires 20k ago when I had to replace the alternator).
Do you all recommend a new oxygen sensor with 141,000 miles? I do plan to keep car this for some years, I run my cars until beat. I don't know if they have a limited life (and I should buy new one) or if I should leave in the original one. I had pulled that out already but not the EGR tap.
Lemonpie
|
|
| |
|
|
MarineGrunt
Enthusiast
Feb 9, 2013, 12:11 PM
Post #10 of 16
(2150 views)
|
|
Re: Venture head gasket replacement; questions
|
Sign In
|
|
My front oxygen sensor went bad around 120K. I had to use my buddy's lift in order to replace it. I tried in my garage at first but couldn't get my arm up in there enough and at the right angle to get to it. It was a piece of cake on the lift. As to the life of one, HT will have to let you know on that. I want to say the oxygen sensor cost about $50.
I stripped a couple of the heat shield bolts in the process of removing them. I ended up having to use one of those stripped bolt sockets. One of the mechanics on here recommended I buy a set awhile back and I'm sure glad I did. I don't know if I would've gotten a couple off without them. Irwin makes the set I got. Auto part stores carry them and are about $20 for a set. You might be able to get some vice grips on the bolts too. I do remember them being tough to come out. If you're out and about you might want to pick up a few extra bolts. I think the are 6mm. I had to replace most of them because I stripped the heads trying to remove them. Keep soaking them with PB Blaster. That stuff works great. Maybe try and spray up under the top half of the shield if you can.
Once you get the heat shield off you'll be able to get to the manifold nuts. Like I mentioned before, 5 are easy and 1 is a pain. You just can get much of a turn on it and have to go by feel because you can see it. That's where that 13mm gear wrench will make a huge difference. I didn't have it when removing, but if I did, it wouldn't have been bad. It probably took me 15 minutes to get it off without the gear wrench but a minute to get it back on with the gear wrench. Once the nuts are off you might have to take a pry bar and gently pry back on the manifold to slide it off of the studs. You just barely have enough play for it to slide off. It wasn't bad though.
If you haven't done so in the past I'd replace the thermostat too. That thing is a pain to get to otherwise. When our van was overheating last year I replaced it before doing the intake. Wasn't much fun. You have to remove all kinds of stuff along with the heat shield too. I couldn't get to the bottom bolt with the heat shield in place. Best $8 you'll ever spend!
For that strut bracket I completely loosened all the bolts from the compressor but left them in the compressor and let the bolts, along with the compressor, lay against the sub frame. If facing the van the top right bolt of the compressor runs through a bolt hole in the very bottom of the bracket. There are two other bolts on that bracket. One up top that runs into the head and then another one a little over halfway down. You're able to get to those two bolts with the compressor in place. Like HT said, you have to pretty much remove the compressor in order for that bracket to slide up. The compressor slides forward and down a few inches which is enough to be able to remove the bracket.
I picked up one of these to clean all of the surfaces. They work great for aluminum surfaces. I used the white and yellow. I think the green is course, white is fine and yellow is medium.

(This post was edited by MarineGrunt on Feb 9, 2013, 12:11 PM)
|
|
| |
|
|
Sidom
Veteran
/ Moderator

Feb 9, 2013, 12:22 PM
Post #11 of 16
(2146 views)
|
|
Re: Venture head gasket replacement; questions
|
Sign In
|
|
These threads are huge so it may have already been mentioned but just in case you might have over looked it....
When working on the back bank, if you use a floor jack & block of wood & put it under the tranny pan & jack the engine, it will roll the engine forward making the back bank more accessable....
(This post was edited by Sidom on Feb 9, 2013, 12:23 PM)
|
|
| |
|
|
Lemonpie
User
Feb 9, 2013, 12:23 PM
Post #12 of 16
(2141 views)
|
|
Re: Venture head gasket replacement; questions
|
Sign In
|
|
Thank you for the helpful details MG! (I knew enough to replace the thermostat as it looks tough to replace from scratch). Thank you about the oxygen sensor, Hammertime. I have never had a issue with an oxy sensor and now I know- replace it.
Forum is a blessing.
Lemonpie
|
|
| |
|
|
Hammer Time
Ultimate Carjunky
/ Moderator
Feb 9, 2013, 1:06 PM
Post #13 of 16
(2137 views)
|
|
Re: Venture head gasket replacement; questions
|
Sign In
|
|
0/2 sensors get clogged over time and become less sensitive to rich mixture. The can be a cause of some serious fuel mileage loss.
~~~~~~~~~~~~~~~~~~~~~~~~~~~~~~~~~~~~~~~~~~~~~~~~~~~~~~~~~~~~~~~~~~~~
We offer help in answering questions, clarifying things or giving advice but we are not a substitute for an on-site inspection by a professional.
|
|
| |
|
|
Lemonpie
User
Feb 9, 2013, 1:43 PM
Post #14 of 16
(2130 views)
|
|
Re: Venture head gasket replacement; questions
|
Sign In
|
|
Do you think I should replace the one downstream of the catalytic converter too? I'm not working in that area.
Lemonpie
|
|
| |
|
|
Hammer Time
Ultimate Carjunky
/ Moderator
Feb 9, 2013, 1:46 PM
Post #15 of 16
(2126 views)
|
|
Re: Venture head gasket replacement; questions
|
Sign In
|
|
No, that one has no effect on engine performance.
~~~~~~~~~~~~~~~~~~~~~~~~~~~~~~~~~~~~~~~~~~~~~~~~~~~~~~~~~~~~~~~~~~~~
We offer help in answering questions, clarifying things or giving advice but we are not a substitute for an on-site inspection by a professional.
|
|
| |
|
|
MarineGrunt
Enthusiast
Feb 9, 2013, 1:55 PM
Post #16 of 16
(2122 views)
|
|
Re: Venture head gasket replacement; questions
|
Sign In
|
|
I have always used a ratchet strap to rotate the engine forward. I like the idea about using a jack though. I'll have to try that next time. Hopefully there won't be a next time though.
|
|
| |
|
