Main IndexAuto Repair Home Search Posts SEARCH
POSTS
Who's Online WHO'S
ONLINE
Log in LOG
IN


Search Auto Parts

1993 lumina


  Email This Post


mfordb5
User

Dec 30, 2012, 1:03 PM

Post #1 of 4 (2499 views)
1993 lumina Sign In

How do I get to the Ignition cylinder to change it. I have the steering wheel off and ran into a part I can't get off. It was sfter I got the cover off holding the turn signal, then there is another cover showing some bearings in the front.


Discretesignals
Ultimate Carjunky / Moderator
Discretesignals profile image

Dec 30, 2012, 1:55 PM

Post #2 of 4 (2459 views)
Re: 1993 lumina Sign In

tilt steering?


Since we volunteer our time and knowledge, we ask for you to please follow up when a problem is resolved.


mfordb5
User

Dec 31, 2012, 10:00 AM

Post #3 of 4 (2430 views)
Re: 1993 lumina Sign In

Yes

In Reply To


Discretesignals
Ultimate Carjunky / Moderator
Discretesignals profile image

Jan 1, 2013, 9:40 AM

Post #4 of 4 (2406 views)
Re: 1993 lumina Sign In

Do you have these tools?

J 35689-A Terminal Remover (Did you remove the turn signals switch already?)


J 21854-01 Pivot Pin Remover (Lisle 19940)


Remove or Disconnect

Tools Required: J 35689-A Terminal Remover
J 21854-01 Pivot Pin Remover

Important: Steering column must be removed from car before proceeding with the following steps.

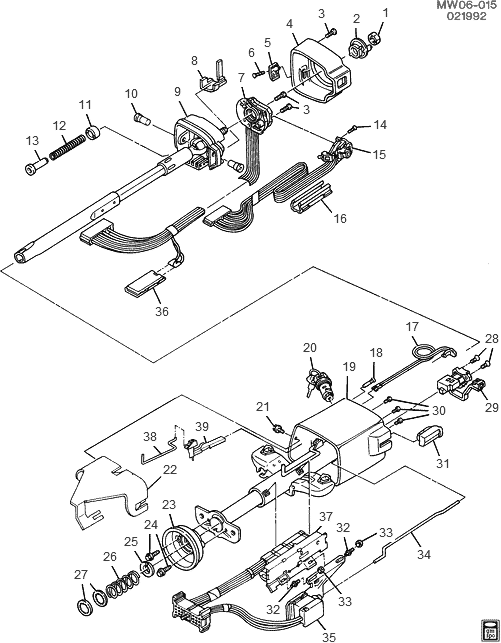
1. Do steps 1 through 18 under Turn Signal Switch Assembly / Service and Repair / Remove or Disconnect. See: Turn Signal Switch > Procedures

2. Pull tilt lever (30) and tilt column all the way up.

3. Insert phillips head screwdriver into square opening in spring retainer (11), push down and turn left to release retainer (11) and wheel tilt spring (12).

4. Spring retainer (11), tilt spring (12) and tilt spring guide (13).

5. Two lower spring retainers (28) and discard.

6. Lower bearing spring (27) and lower bearing seat (26).

7. Adapter screws (25).

8. Adapter and lower bearing assembly (24).

9. Two pivot pins (10) with J 21854-01 as shown.

10. Place lock cylinder (20) in "Run" position.

11. Pull tilt lever (30) to release shaft and housing assembly (9).

12. Shaft and housing assembly (9) from jacket and bowl assembly (19).

13. Place lock cylinder (20) in "Off-Lock" position and remove key.

14. Buzzer switch (17). Use screwdriver to lift switch tab and pull gently on wires to remove.

15. Lock retaining screw (18).

16. Lock cylinder (20).

17. Column tilt bumpers (31) with vise grips. If bumper is broken off use a 5.9 mm (7/32 in.) drill to remove remaining piece of bumper.

18. Tilt bracket screws (29).

19. Tilt lever and bracket assembly (30).

20. Rod cap (32) from dimmer switch rod (35).

21. Jacket and bowl assembly (19).

Install or Connect

Important: All fasteners in the following steps must be firmly seated before being tightened to specified torque.

1. Rod cap (32) into jacket and bowl assembly (19).

2. Tilt lever and bracket assembly (30) into jacket and bowl assembly (19).

3. Tilt bracket screws (29) and torque to 5.2 Nm (46 lb. in.).

4. Three tilt bumpers (31) into jacket and bowl assembly (19) until bottomed.

5. Steering column lock cylinder set (20) in "Off- Lock" position with key removed.

6. Lock retaining screw (18) and torque to 7.0 Nm (62 lb. in.).

7. Buzzer switch assembly (17). Push switch down into retaining bore until bottomed with plastic tab covering lock retaining screw (18).

8. Insert key and place lock cylinder (20) in "Run" position.

9. Shaft and housing assembly (9).

10. Lubricate pivot pins (10) with lithium grease. - Two pivot pins (10) into pivot holes in shaft and housing assembly (9) until bottomed.

11. Pull tilt lever (30) and tilt column all the way up.

12. Lubricate tilt spring guide (13) with lithium grease. - Tilt spring guide (13) into tilt spring (12).

13. Guide (13) and tilt spring (12) with spring retainer (11) as follows: - Be sure that recess in spring guide (13) engages round locating tab in jacket and bowl assembly (19). - Insert phillips head screwdriver into square opening in spring retainer (11), push down and turn right to lock in place.

14. Adapter and lower bearing assembly (24).

15. Adapter screws (25) and torque to 3 Nm (26 lb. in.).

16. Lower bearing seat (26) and lower bearing spring (27).

17. Two new lower spring retainers (28), compress spring (27) until retainers are positioned 29 mm (1.14 in.) from lower end of steering shaft.

18. Steering Column in car.

19. Park lock cable into ignition switch inhibitor and snap in place.

20. Do steps 1 through 18 under Turn Signal Switch Assembly / Service and Repair / Install or Connect. See: Turn Signal Switch > Procedures


Since we volunteer our time and knowledge, we ask for you to please follow up when a problem is resolved.


  Email This Post


Feed Button


Search for (options) Privacy Sitemap