|

|
1992 mercury sable radiator removal
|
|
|
| |
|
|
mdjaradat@gmail.com
New User
Sep 10, 2013, 10:11 PM
Post #1 of 2
(2607 views)
|
|
1992 mercury sable radiator removal
|
Sign In
|
|
Hi all, so im trying to replace the radiator on my 92 mercury sable. I managed to disconnect everything except for the lower aluminum transmission line. Its literally unreachable. It seems like the only way to reach it is by removing the power steering pump. I didn't jack the car up because it seems like I can't reach it that way either. Can anyone tell me the proper way to do it, do I really have to mess with the powersteering? thx.
|
|
| |
|
|
Hammer Time
Ultimate Carjunky
/ Moderator

Sep 11, 2013, 3:12 AM
Post #2 of 2
(2587 views)
|
|
Re: 1992 mercury sable radiator removal
|
Sign In
|
|
First off, let me suggest that you change your user name. Exposing your e-mail address will bring the wrath of the spammers down on you.
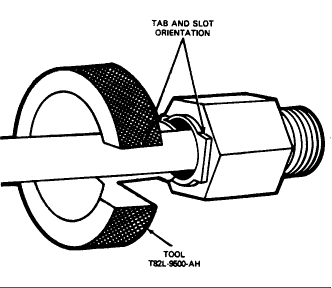
Those lines require a special release tool to remove them
REMOVAL
- Drain cooling system by removing radiator pressure cap and opening draincock located at lower rear corner of radiator inlet tank. Three revolutions are required to open draincock to full open position.
- Remove rubber overflow tube from coolant recovery bottle and detach it from radiator. On Taurus SHO, disconnect tube from radiator and remove recovery bottle.
- Disconnect battery ground cable.
- Remove two shroud upper retaining screws and lift shroud out of lower retaining clip.
- Disconnect the electric cooling fan motor wires and remove fan and shroud assembly.
- Loosen upper and lower hose clamps at radiator and remove hoses from radiator connectors.
- Disconnect two automatic transmission oil cooling lines from radiator fittings with Line Disconnect Tool TS2L-9500-AH or equivalent, on vehicles equipped with automatic transaxles.
- On 3.OL and SHO engines, remove two radiator upper retaining screws.
- On 3.8L engine, remove two hex nuts from RH radiator support bracket. Remove bracket.
- On 3.8L engine, remove two screws from LH radiator support bracket. Remove bracket.
- Tilt radiator back (rearward) approximately 25mm (1 inch) and lift directly upward clear of radiator support.
- If either hose is to be replaced, loosen clamp at engine end and slip hose off connections with a twisting motion.
- Remove radiator lower support rubber pads, it pad replacement is necessary.
INSTALLATION
- Position radiator lower support rubber pads to lower support, if necessary.
- If either hose has been replaced, position hose on engine with index arrow in-line with mark on fitting at engine. On 3.8L engines, install constant tension hose clamp between alignment marks on hose.
- Position radiator into engine compartment and to radiator support. Insert the moulded pins at bottom of each tank through slotted holes in lower support rubber pads.
- Inspect radiator nylon tank upper mounting bushings for damage. Replace if damaged.
- On 3.8L engine, inspect outlet tank metallic pin bracket, LH and RH radiator support brackets. Replace if damaged.
- On 3.8L engine, if outlet tank pin bracket must be replaced, remove two retaining bolts. Position bracket on the outlet tank. Install two retaining bolts and tighten to 9-13 Nm (80-115 lb-in).
- Ensure plastic pads on bottom of radiator tanks are resting on rubber pads. Install two upper retaining bolts to attach radiator to radiator support. Tighten to 5-7 Nm (45-61 lb-in). On 3.8L, tighten to 17-27 Nm (13-19 lb-ft).
- On 3.8L, position RH support bracket onto radiator and over two studs on radiator support.
- On 3.8L, position LH support bracket over radiator and radiator support. Align holes in bracket with corresponding holes in radiator support and secure with two screws. Tighten screws to 12-24 Nm (9-17 lb-ft).
- Secure RH support bracket to radiator support with two hex nuts. Tighten nuts to 12-24 Nm (9-17 lb-ft).
- Install radiator upper and lower hoses to radiator. Position hose on radiator connector so that index arrow on hose is in line with mark on connector. Tighten clamps to 2.3-3.4 Nm (20-30 lb-in) on 3.OL engines. On 3.8L and 3.OL SHO engines, install constant tension hose clamp between alignment marks on hoses.
NOTE:
On vehicles with automatic transaxles, connect oil cooler lines using Pipe Sealant with Teflon� D8AZ- 19554-A (ESG-M4G 194-A) or equivalent oil resistant sealer.
- Install fan and shroud assembly by connecting motor wiring and positioning on lower retainer clips. Attach top of shroud to radiator with two screw and washer assemblies, and nut. Tighten to 4 Nm (36 lb-in).
- Attach rubber overflow tube to radiator filler neck overflow nipple and coolant recovery bottle. On Taurus SHO, install coolant recovery bottle and connect overflow hose.
- Install new 50/50 mixture of water and antifreeze. Operate engine for 15 minutes. Check coolant level and bring it to within 38mm (1 - 1/2 inch) of radiator filler neck. Add one vial of Cooling system Stop Leak Powder E6AZ- 19558-A (ESE-M99B 170-A) or equivalent.
- Connect battery ground cable.
~~~~~~~~~~~~~~~~~~~~~~~~~~~~~~~~~~~~~~~~~~~~~~~~~~~~~~~~~~~~~~~~~~~~
We offer help in answering questions, clarifying things or giving advice but we are not a substitute for an on-site inspection by a professional.
(This post was edited by Hammer Time on Sep 11, 2013, 3:14 AM)
|
|
| |
|
| | |
|
